
ConnectCare User Guide
This page is for ConnectCare users. If you're a developer, see also the Developer guide.
Table of Contents
- ConnectCare User Guide
- Quick Start
- CLI Guide
- Features
- Frequently Asked Questions
- Command Summary
- Glossary
Introduction
Welcome to the ConnectCare User Guide, your comprehensive resource for managing client contacts with ease! Designed to help you handle demanding caseloads, ConnectCare empowers you to navigate your client interactions seamlessly. Whether you're troubleshooting issues, just getting started, or looking to enhance your workflow, this guide has you covered.
Who ConnectCare is For
ConnectCare is designed to help social workers with high caseloads, providing solutions that simplifies client management. Whether you're new to the field or a seasoned pro, ConnectCare offers intuitive features that prioritize efficiency, accuracy, and productivity. Furthermore, ConnectCare boasts a range of benefits that directly address the needs of social workers, including:
- Increased Efficiency: Spend less time on software and more time directly helping clients.
- Reduced Errors: Minimize errors caused by switching between input methods.
- Boosted Productivity: Complete tasks faster and free up valuable time for client interaction.
Embrace a Keyboard-Centric Approach
Social workers often spend significant time documenting and updating client information. By minimizing the use of your mouse, ConnectCare allows for a smoother workflow, especially when working remotely or on laptops.
This approach can significantly reduce:
- Hand fatigue and strain.
- Cognitive load from switching between input methods.
- Overall time spent completing tasks.
Work Offline, Stay Productive
ConnectCare doesn't need constant internet. This means you can update client information even in areas with spotty reception. Perfect for home visits, field work, or anywhere life takes you.
Sensitive Data is kept Secure
ConnectCare takes data security seriously. Unlike some systems, ConnectCare stores your client information directly on your device, not on the internet. This reduces the risk of unauthorized access, keeping your client information safe and secure.
Focus on Your Clients, Not Software
ConnectCare simplifies tasks, freeing up your time for what truly matters - building relationships with your clients. Respond faster, deliver better care, and make a real difference in their lives.
Who This Guide Is For
This guide caters to users with varying levels of technical proficiency, requiring only basic keyboard typing skills. Whether you're new to ConnectCare or seeking to enhance your skills, this guide provides comprehensive instructions on all functionalities and commands. From basic navigation to advanced features, this guide serves as your definitive resource for optimizing your usage of ConnectCare.
How to Use This Guide
There is no wrong way to read this guide: if you want to skip ahead, go for it! Each section is contained entirely in itself, and you can find what you are looking for without needing to read the previous sections.
This guide has 4 main sections:
The Quick Start section, we will walk through you in how to get started installing as well as running the ConnectCare on your own desktop.
The Features Section will provide a comprehensive, easy-to-understand guide on how to fully make use of all of ConnectCare's functionalities and commands.
The FAQ section will answer commonly asked questions, addressing potential further queries you might have!
Lastly, the Glossary contains a list of key terms and definitions that might be helpful.
The various boxes used in this guide:
Gives you useful tips that are not entirely necessary to use the application, but help you get the most out of ConnectCare.
Provides additional information and context that extends your understanding of ConnectCare's features.
Important warnings that you should keep in mind while using this User Guide.
Warning: If you are using a PDF version of this document, be careful when copying and pasting commands that span multiple lines as space characters surrounding line-breaks may be omitted when copied over to the application.
Click here to return to the table of contents!
Now that you have a brief idea of what ConnectCare is and whether it is for you, let's move on to using ConnectCare! Read further in our Quick Start Section to find out about how to start using ConnectCare!
Quick start
This section allows you to start caring for your clients as soon as possible! It will help you install and start using the application as fast as possible.
Installation instructions
- To use ConnectCare you will require Java 11 to be installed in your computer.
If you have Java 11 installed
- Check that it is the correct version
- Windows or macOS users might find this guide useful.
- Linux users might find this guide useful.
- If you have the correct version skip ahead to step 4, otherwise, follow step 3 to install Java 11.
If you do not have Java 11 installed
Install Java 11 based on your Operating System
- Windows users should use this guide.
- MacOS users should use this guide.
- Linux users should use this guide.
Download the latest release of
connectcare.jarhere.
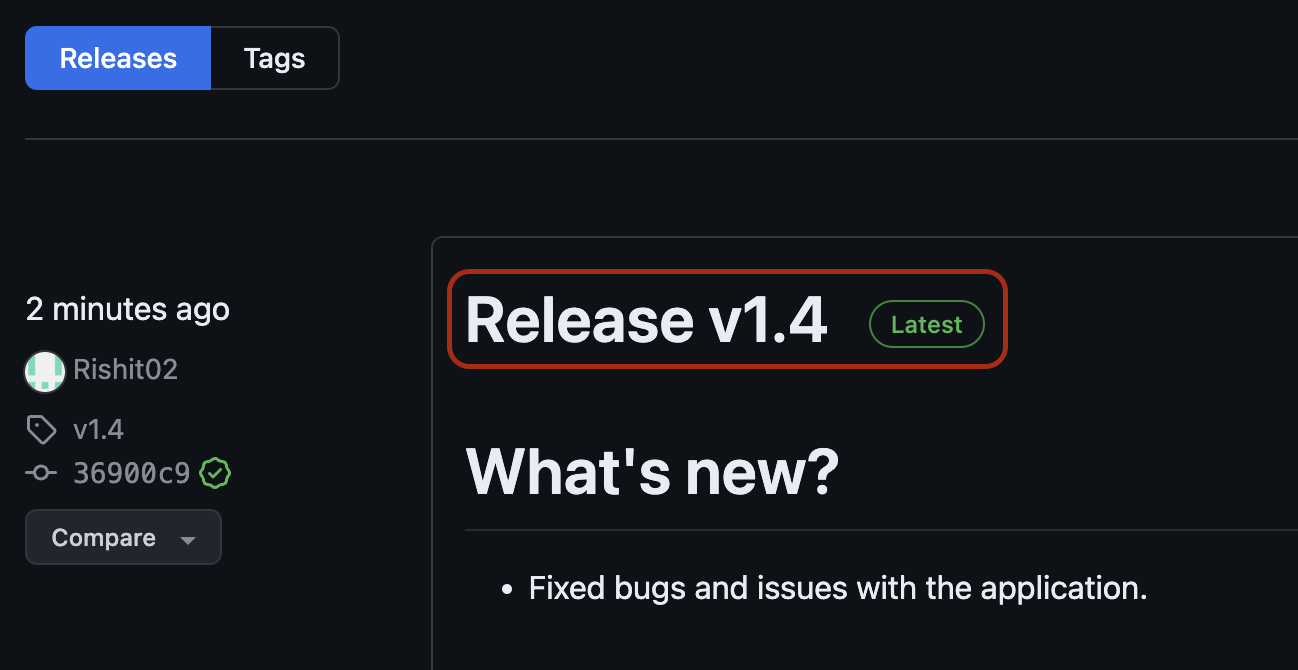
Find the latest release with the 'Latest tag'
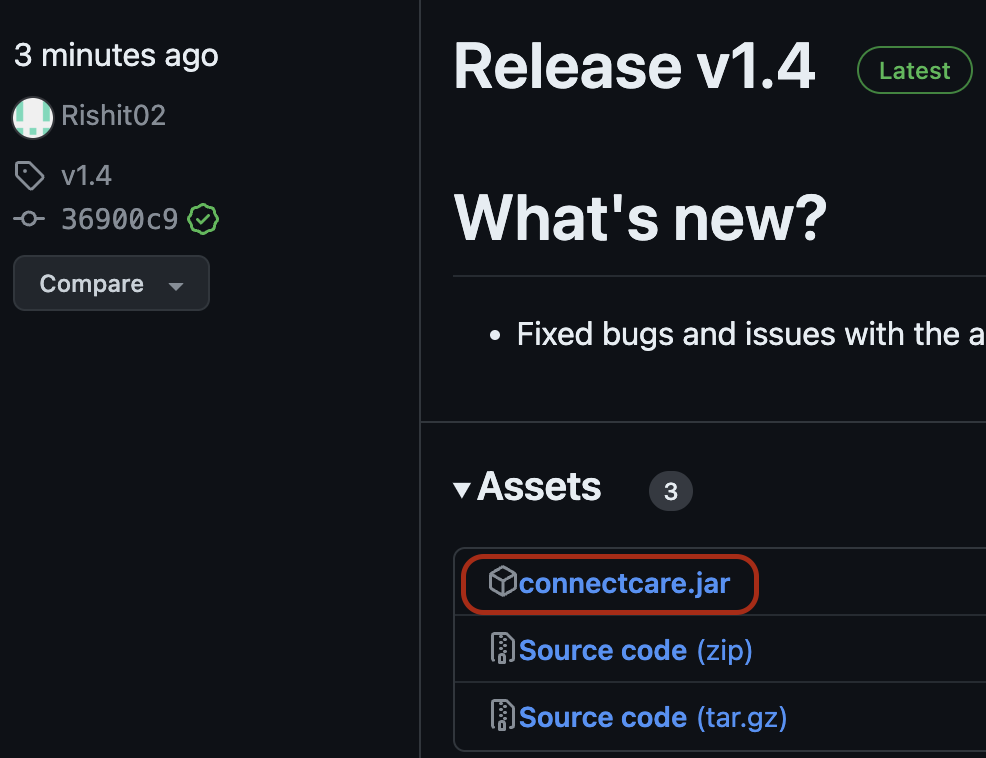
Click on the .jar file at the bottom of the page to download it
- Copy the jar file to the folder you want to use as the home folder.
Startup instructions
- Double-click on the
connectcare.jarfile to start the application.- If you are facing issues, you can consult this guide.
- macOS users might experience a pop-up that says "connectcar.jar cannot be opened because it is from an unidentified developer." To solve this issue, please consult this Apple guide
Click here to return to the table of contents!
You're now onboarded to our app! Read further in our CLI Guide Section to find out about all the various features and commands that the ConnectCare application offers!
CLI guide
Our application uses a CLI and primarily, running commands is how users interact with the application.
Structure
Each command has the general structure:
- Main command
- Parameters
To enter a command:
- Click on the text box with the placeholder text
Enter command here... - Type in your command, which is made up of a main command, followed by parameters if applicable. Here we have the command
add n/Derek Lau p/92784935 e/dlau@example.comentered into the command box.
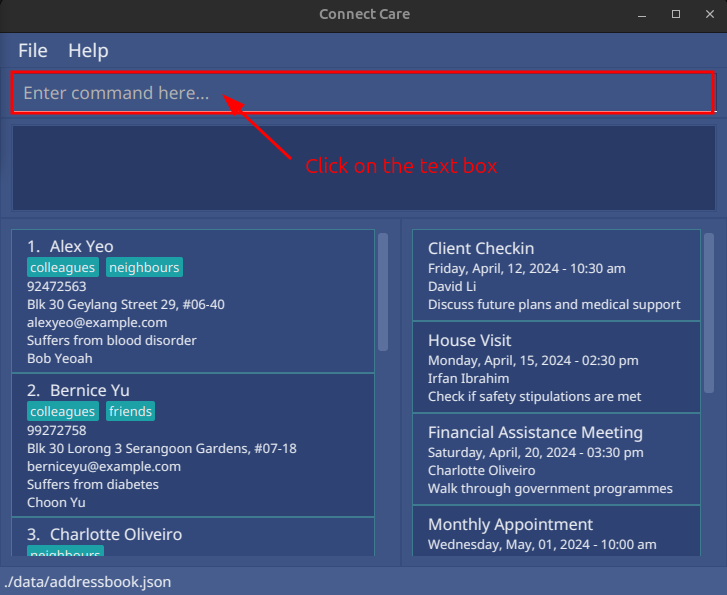
Figure 1.1: Application on startup
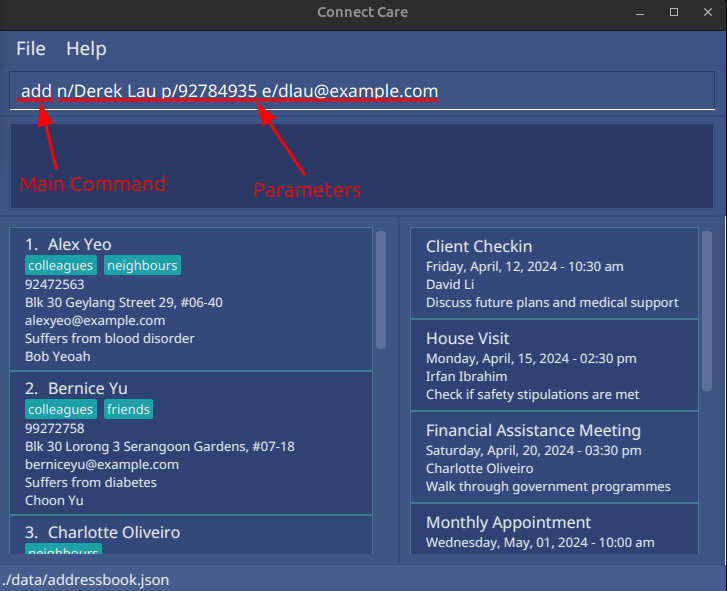
Figure 1.2: Application with command in textbox
- Press the
ENTERkey and voilà! You have added your first client with the CLI!
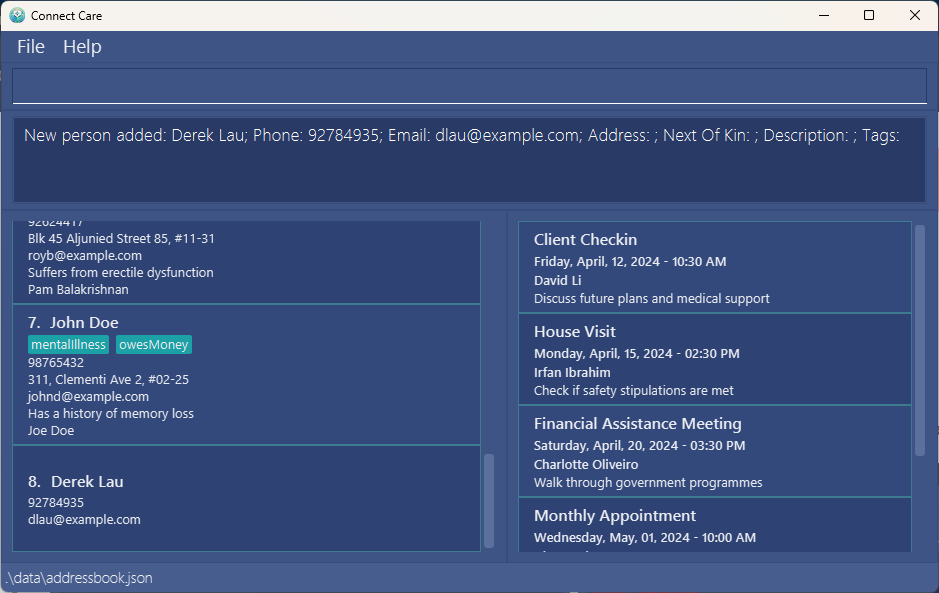
Figure 1.3: Application after command is executed
Notes about the command format
In this guide, words in
UPPER_CASEare the parameters to be supplied by the user. e.g. inadd n/NAME,NAMEis a parameter which can be used asadd n/John Doe.Parameters in square brackets are optional. e.g
n/NAME [t/TAG]can be used asn/John Doe t/friendor asn/John Doe.Parameters with
…after them can be used multiple times including zero times. e.g.[t/TAG]…can be used as (i.e. 0 times),t/friend,t/friend t/familyetc.Parameters can be in any order. e.g. if the command specifies
n/NAME p/PHONE_NUMBER,p/PHONE_NUMBER n/NAMEis also acceptable.Extraneous parameters for commands that do not take in parameters (such as
help,list,exitandclear) will be ignored. e.g. if the command specifieshelp 123, it will be interpreted ashelp.
Click here to return to the table of contents!
You're all set to use the CLI to its full potential! Read further in our Features Section to find out about all the various features and commands that the ConnectCare application offers! Or jump straight to the Command Summary if you are already familiar with the features!
Features
Client Management
Connect care provides the following commands to help you manage your clients:
- Adding a client:
add - Deleting a client:
delete - Updating a client:
update - Listing all clients:
list - Finding clients:
find - Displaying a client's information:
display - Clearing all entries:
clear
Adding a client: add
This command adds a new client to your client list.
Format: add n/NAME p/PHONE_NUMBER e/EMAIL [a/ADDRESS] [k/NEXT_OF_KIN] [d/DESCRIPTION] [t/TAG]…
Examples:
add n/John Doe p/98765432 e/johnd@example.comadd n/Betsy Crowe t/friend d/Takes anxiety medication k/Bethany Crowe e/betsycrowe@example.com a/Blk 684A Jurong West Central 1 #10-124 p/92748321 t/lowPriorityadd n/Aaron James p/84362143 e/billj@example.com a/400 Balestier Road #02-27 Balestier Plaza t/highPriority k/John Doe d/Has low blood pressure
Walkthrough:
The screenshots below are what you would expect when using the add command. In this example, after using the list command,
the full clients list is displayed. Thereafter, the add command was used, using the parameters add n/John Doe p/98765432 e/johnd@example.com a/311, Clementi Ave 2, #02-25 k/Joe Doe d/Has a history of memory loss t/mentalIllness t/owesMoney.
After execution, the client John Doe is added successfully with the corresponding parameters!
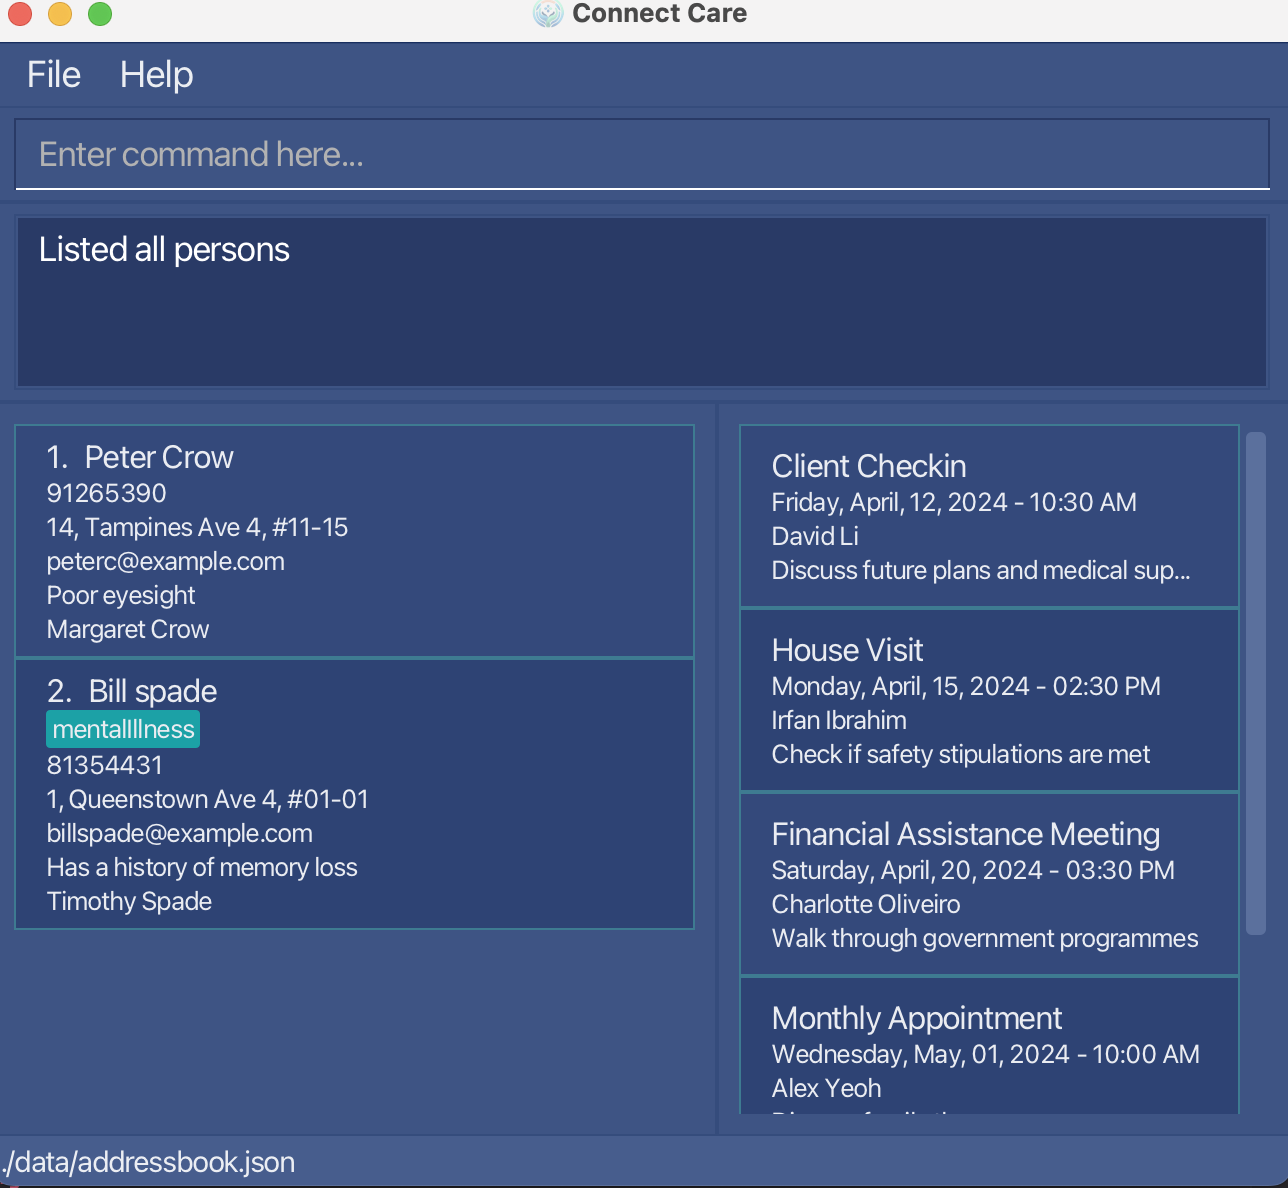
Figure 1.1: Before the add command is executed
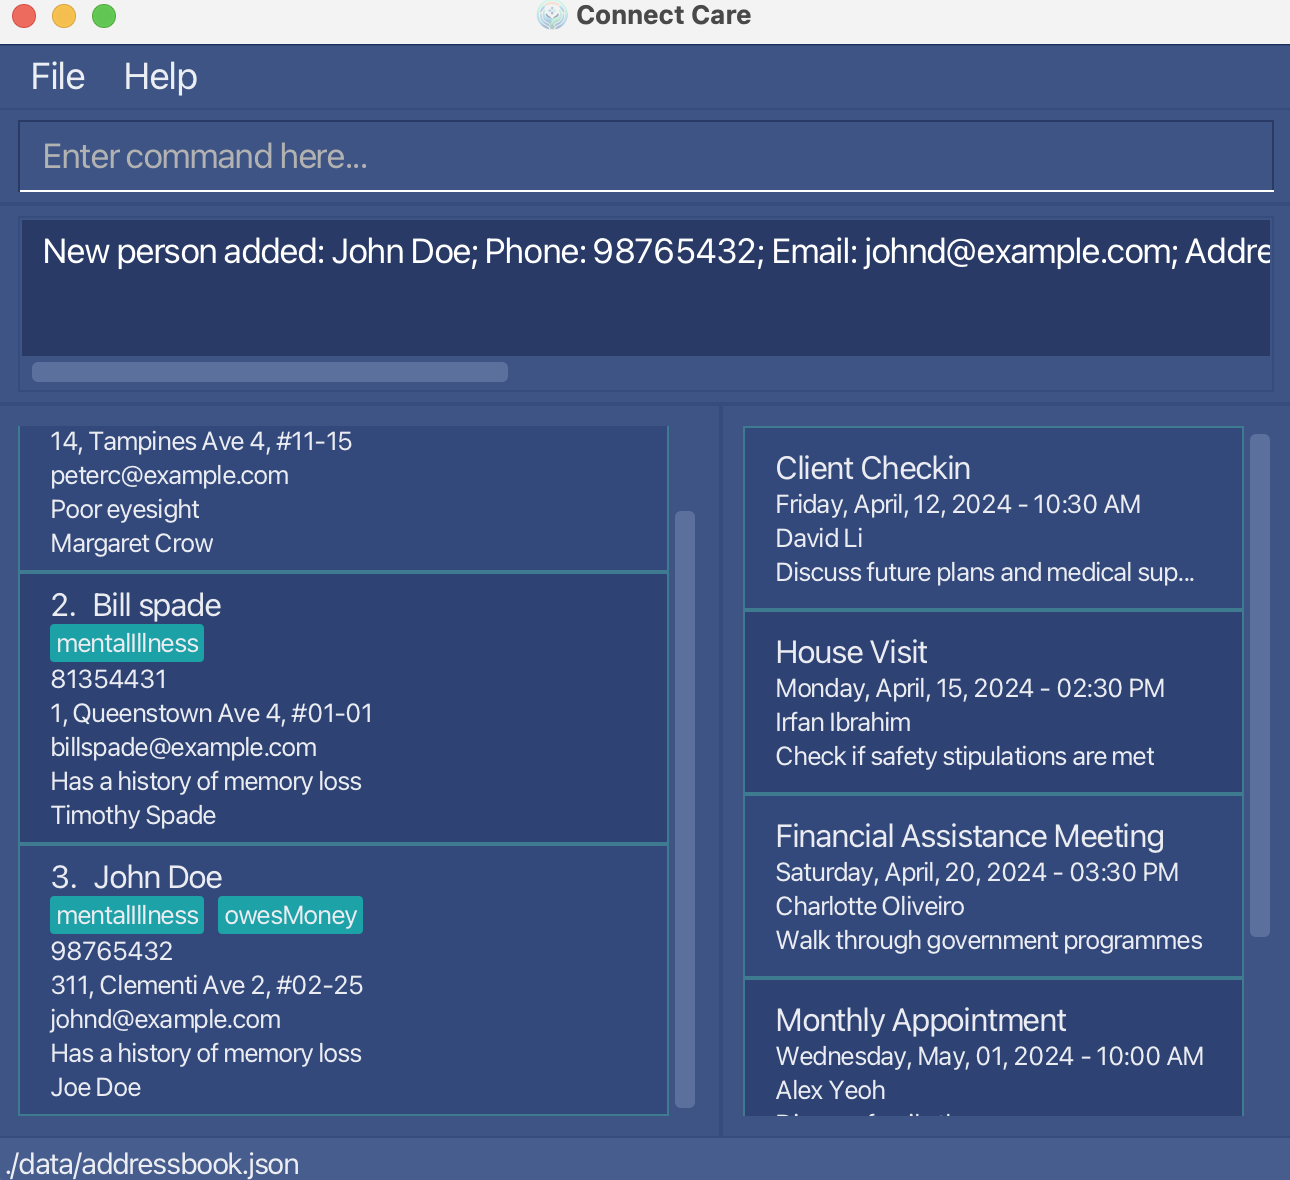
Figure 1.2: After the add command is executed
What if the command was used with invalid parameters? In the example on the left, the command add n/Matthew Kit was used, which does not contain all the compulsory parameters.
Here the error message shown tells us that our command format is invalid and shows an example command, which lets you know the correct parameters to use for the command.
In the example on the right, the command add n/Matthew Kit p/abc65432 e/matk@example.com a/123, Queenstown Ave 2, #03-25 k/Sofie Poe d/Short of hearing is used, which again is invalid. Here the error message shown is Phone numbers should only contain numbers, and it should be at least 3 digits long which lets you know specifically that the phone number given was invalid.
As the commands given were invalid, there would be no changes to the client list.
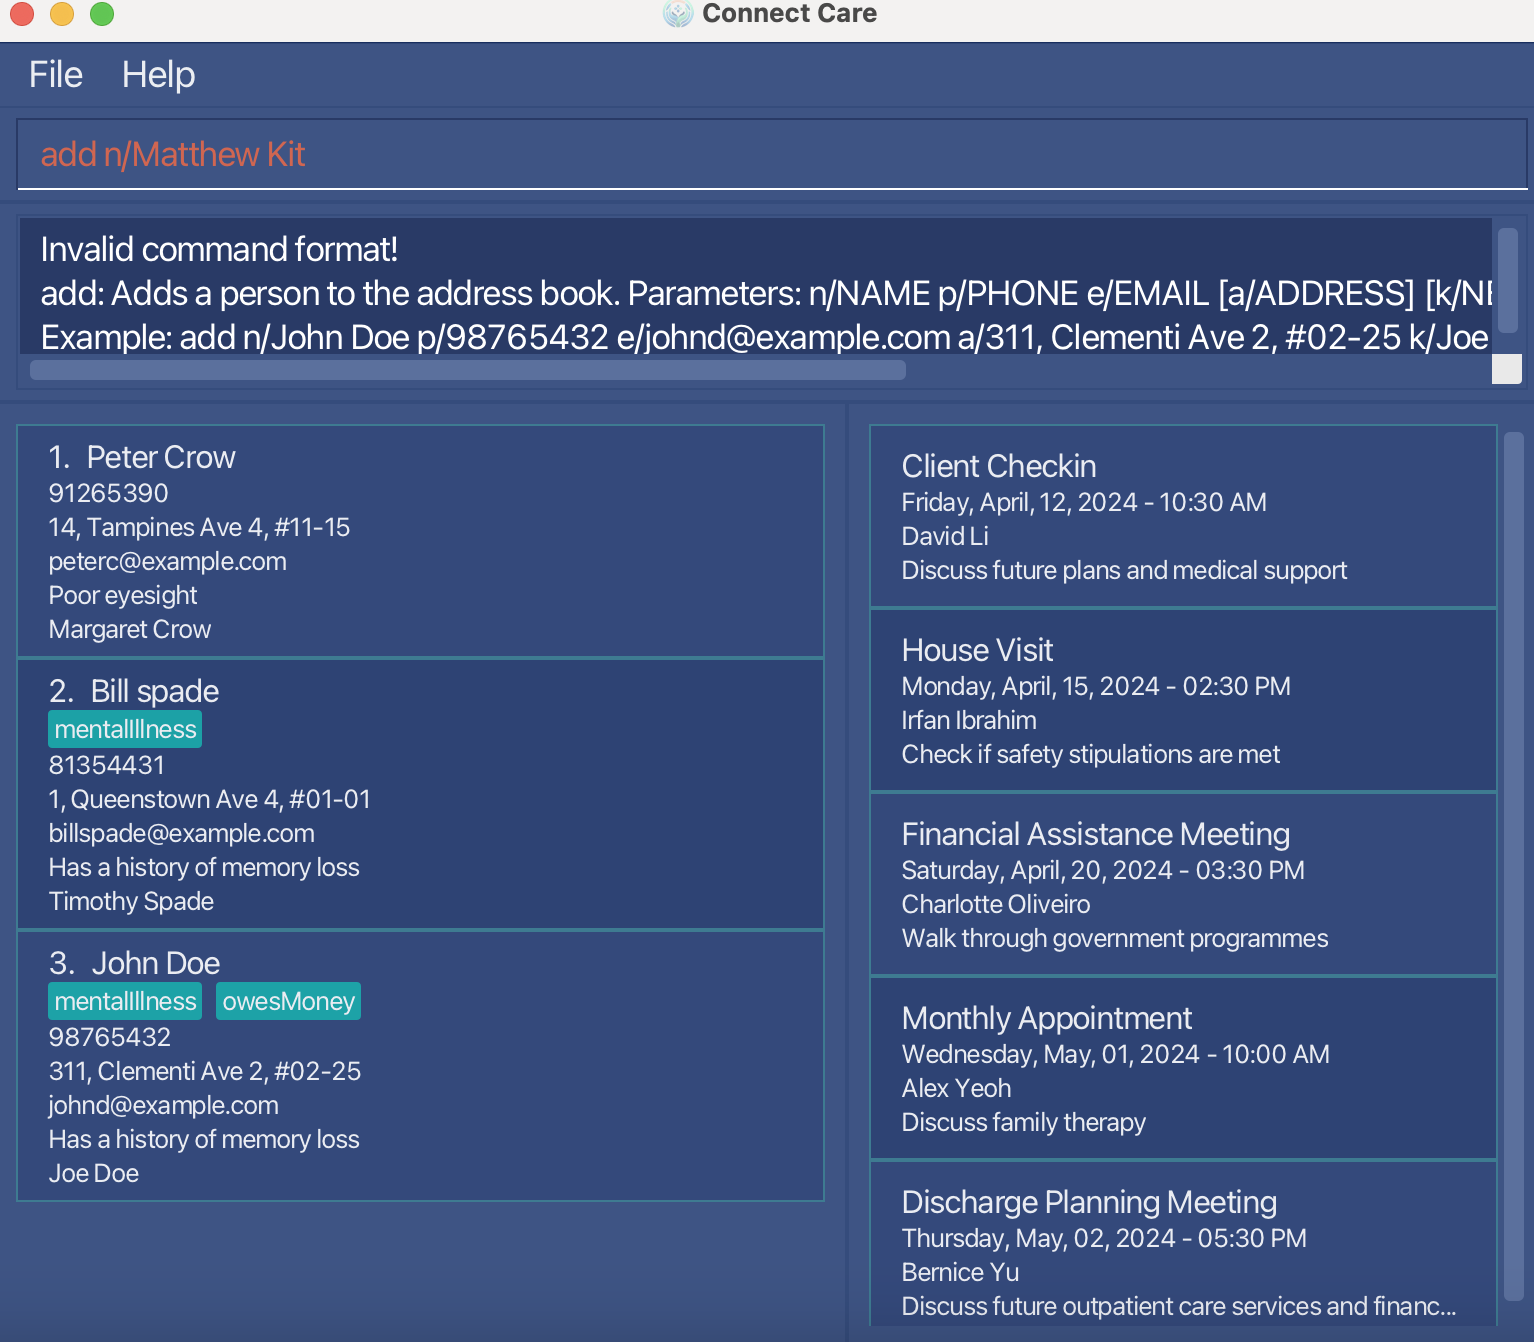
Figure 1.3: After the invalid add command without all parameters is executed
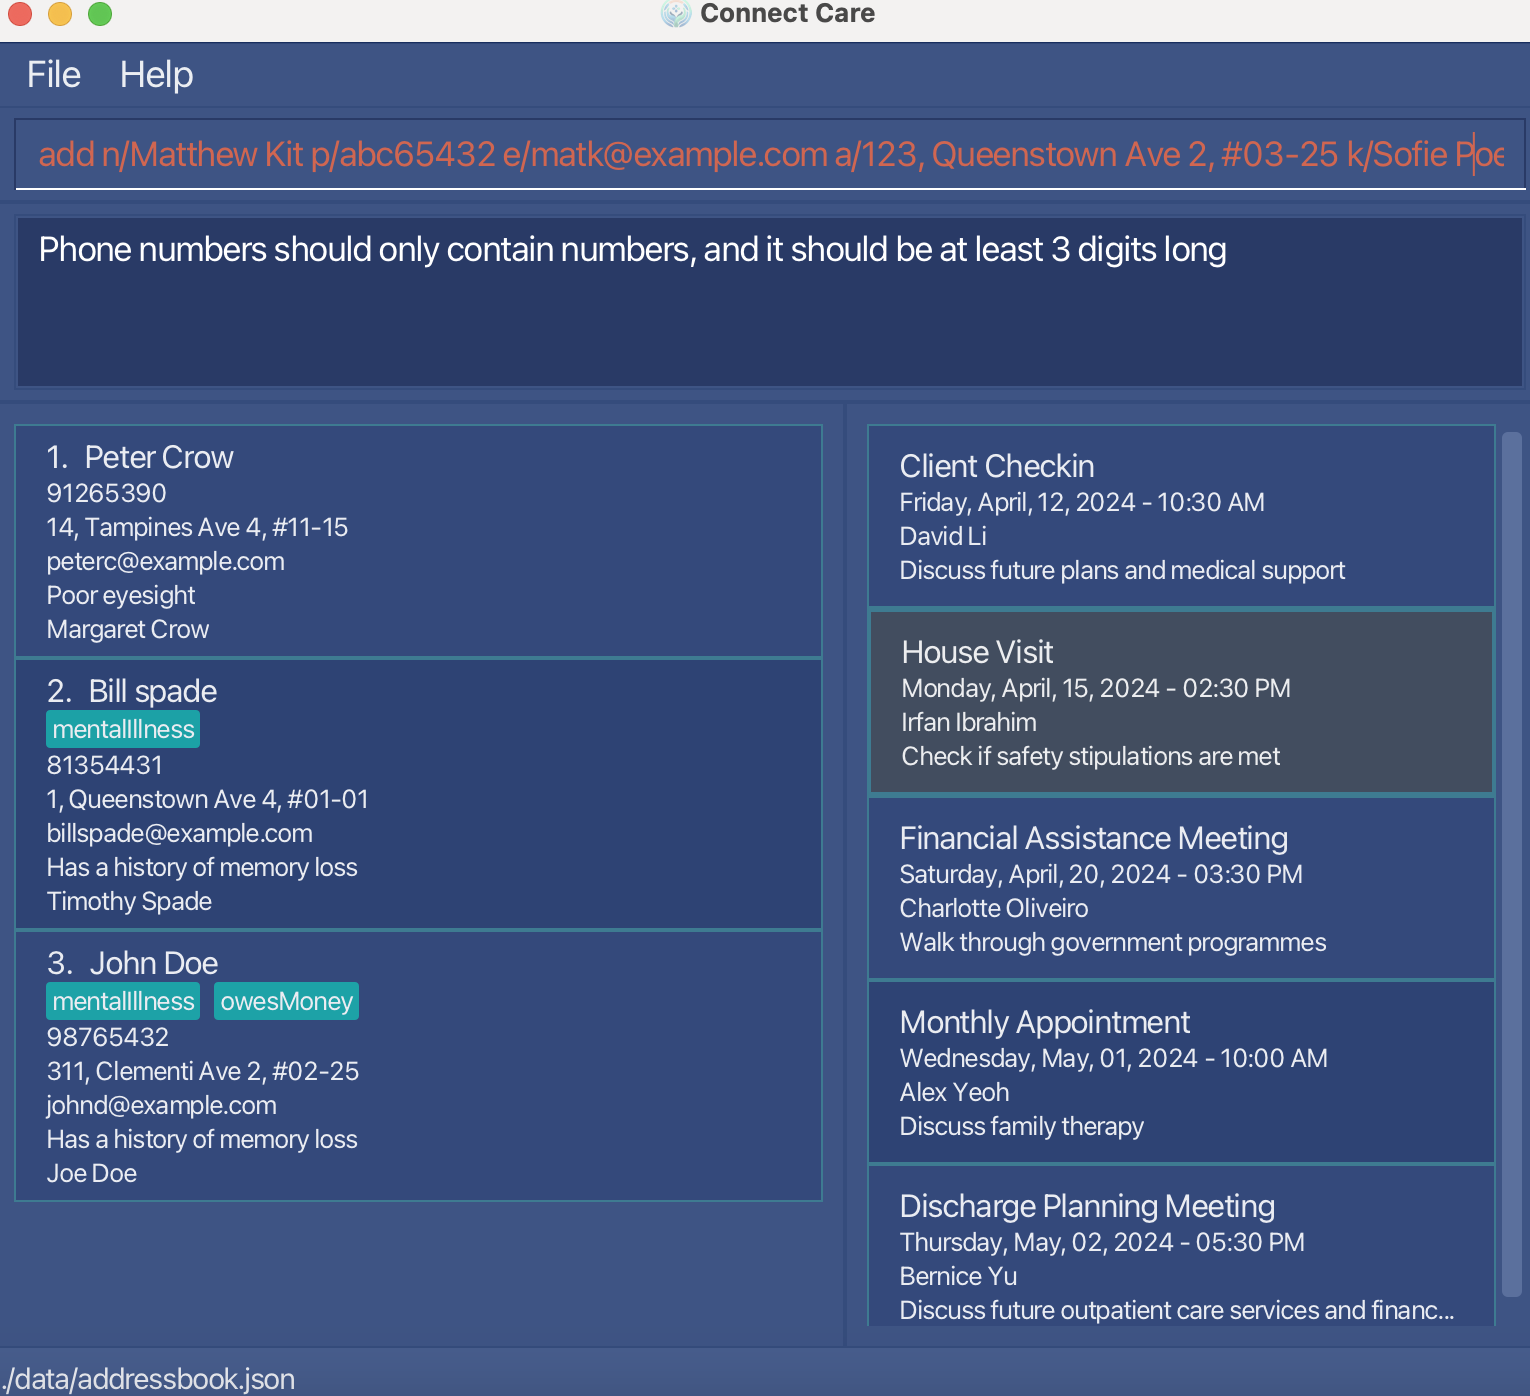
Figure 1.4: After the invalid add command with incorrect parameters is executed
Click here to return to the table of contents!
Deleting a client: delete
This command allows you to delete a client at a specified INDEX from your client list.
Format: delete INDEX
Examples:
delete 1would delete the first client in your client list.delete 2would delete the second client in your client list.
Walkthrough:
The screenshots below are what you would expect when using the delete command. In this example, after using the list command,
the full clients list is displayed. Thereafter, the delete 3 command was used, removing John Doe, the first person in the list, from the list of client contacts.
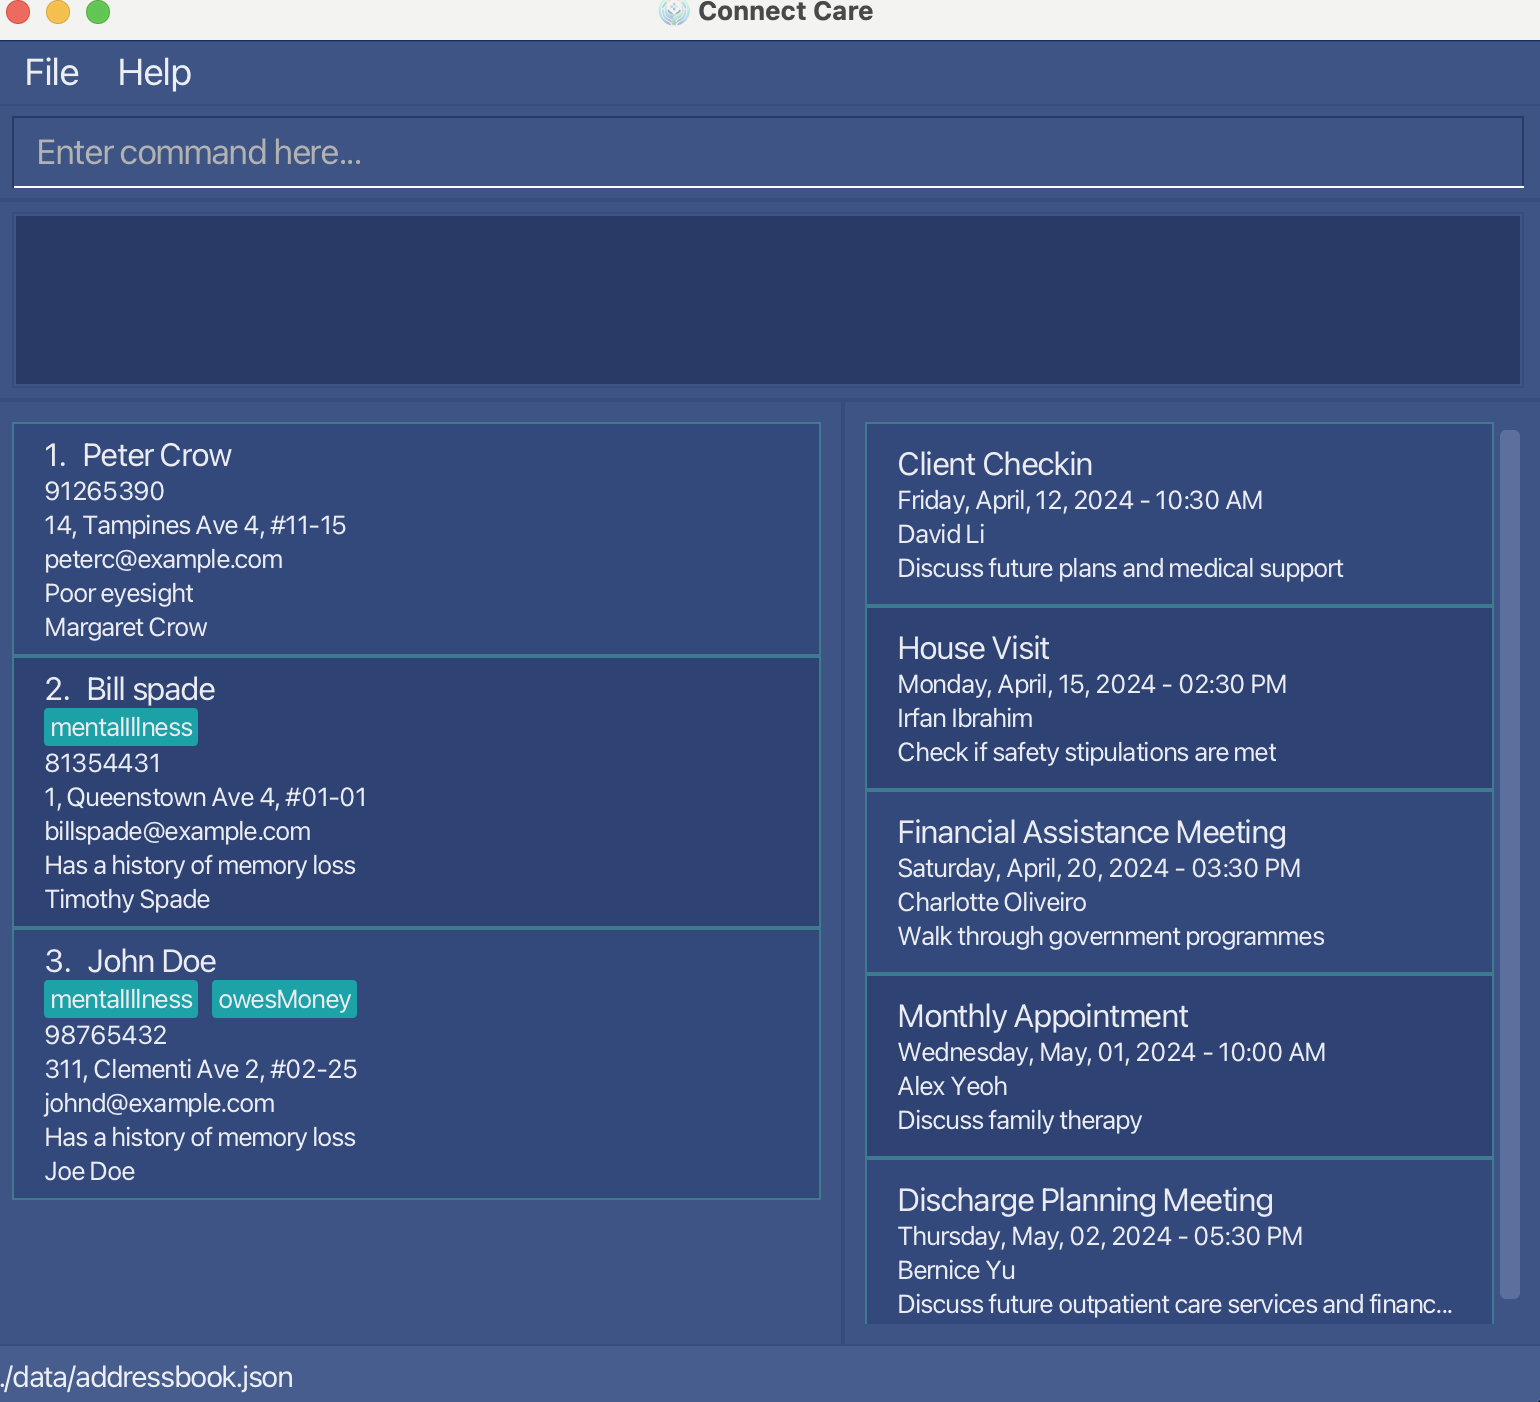
Figure 1.1: Before the delete 3 command is executed
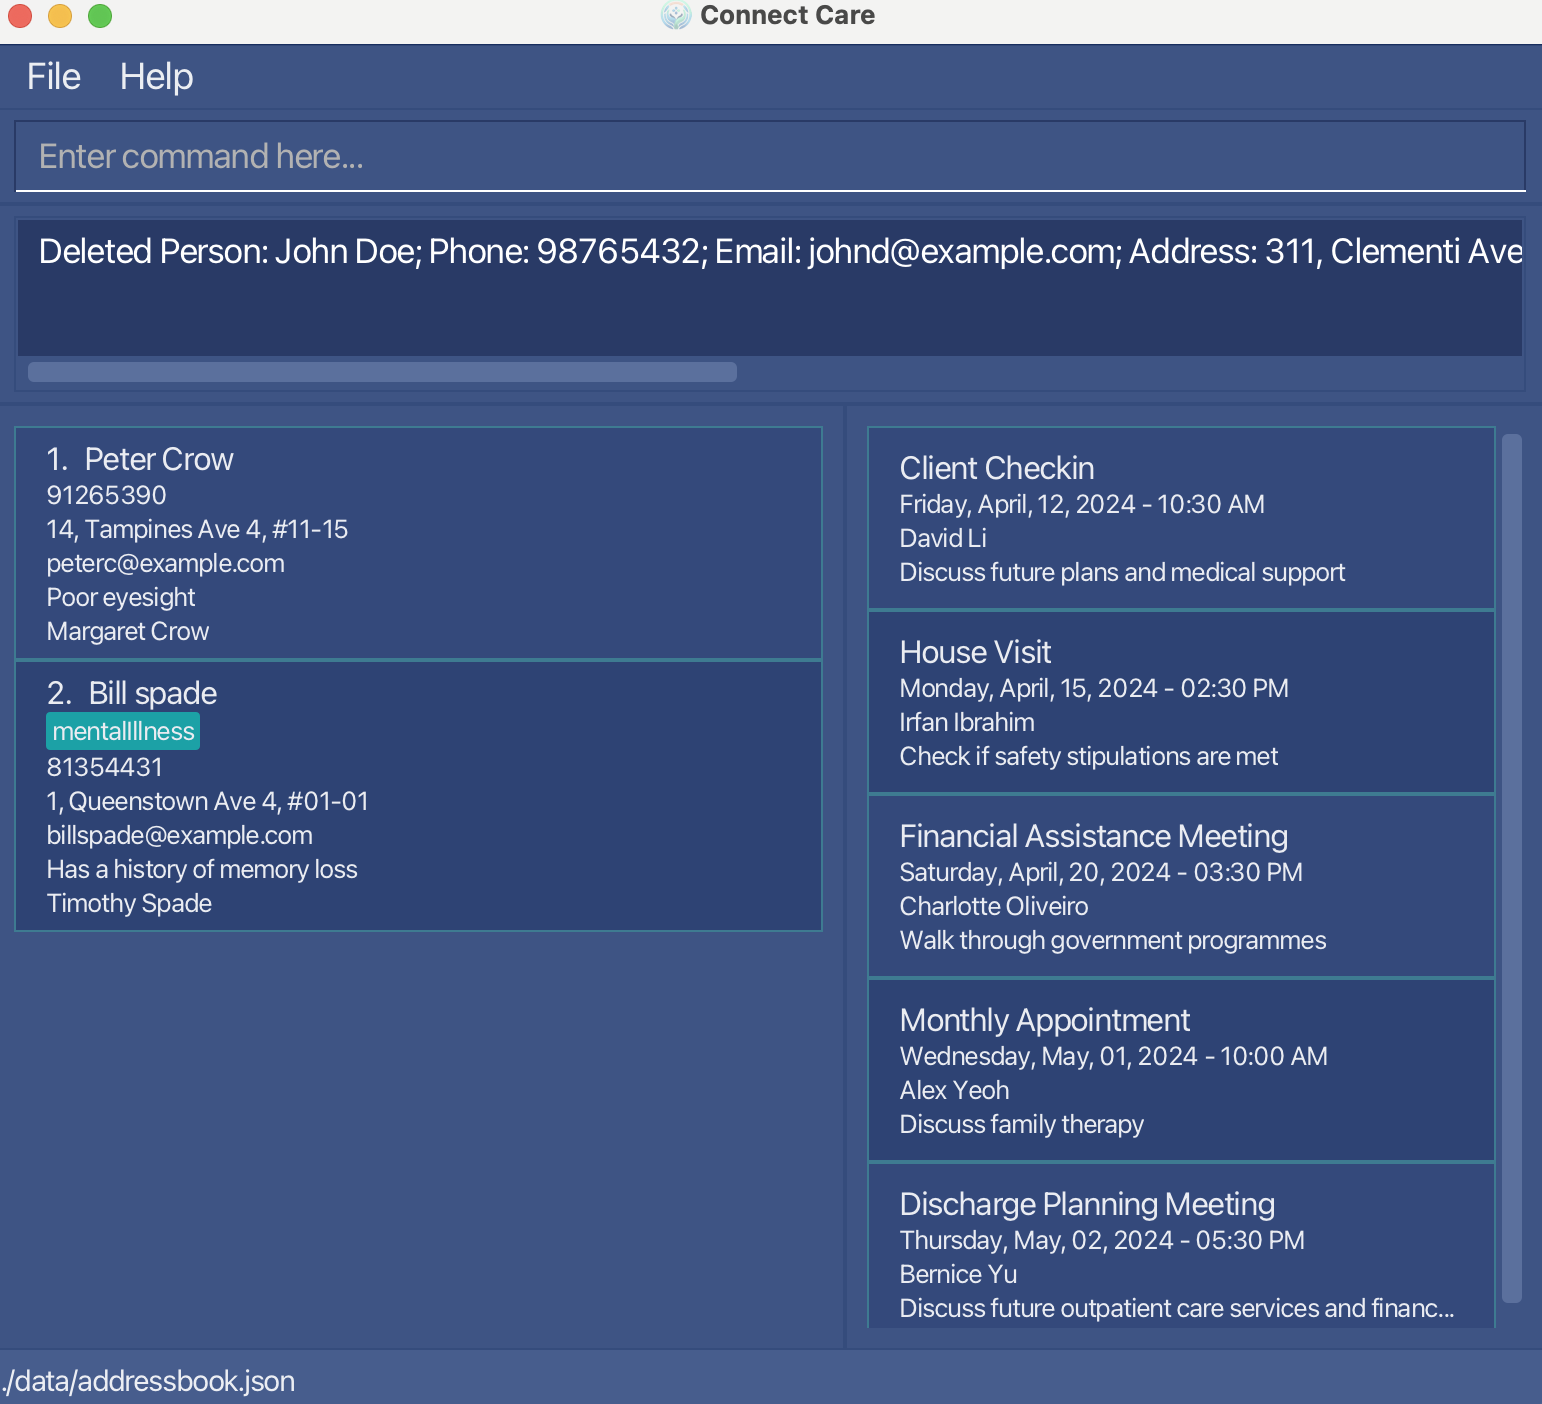
Figure 1.2: After the delete 3 command is executed
What if the command was used with an incorrect index? In the example on the left, delete 0 command was used, which is an invalid index.
Here the error message shown is Invalid command format! ... Parameters: INDEX (must be a positive integer) which lets you know to retype the command with a larger index value.
In the example on the right, delete 4 is used, which again is invalid. Here the error message shown is The person index provided is invalid which lets you know to retype the command with a lower index.
As the commands given were invalid, there would be no changes to the client list.
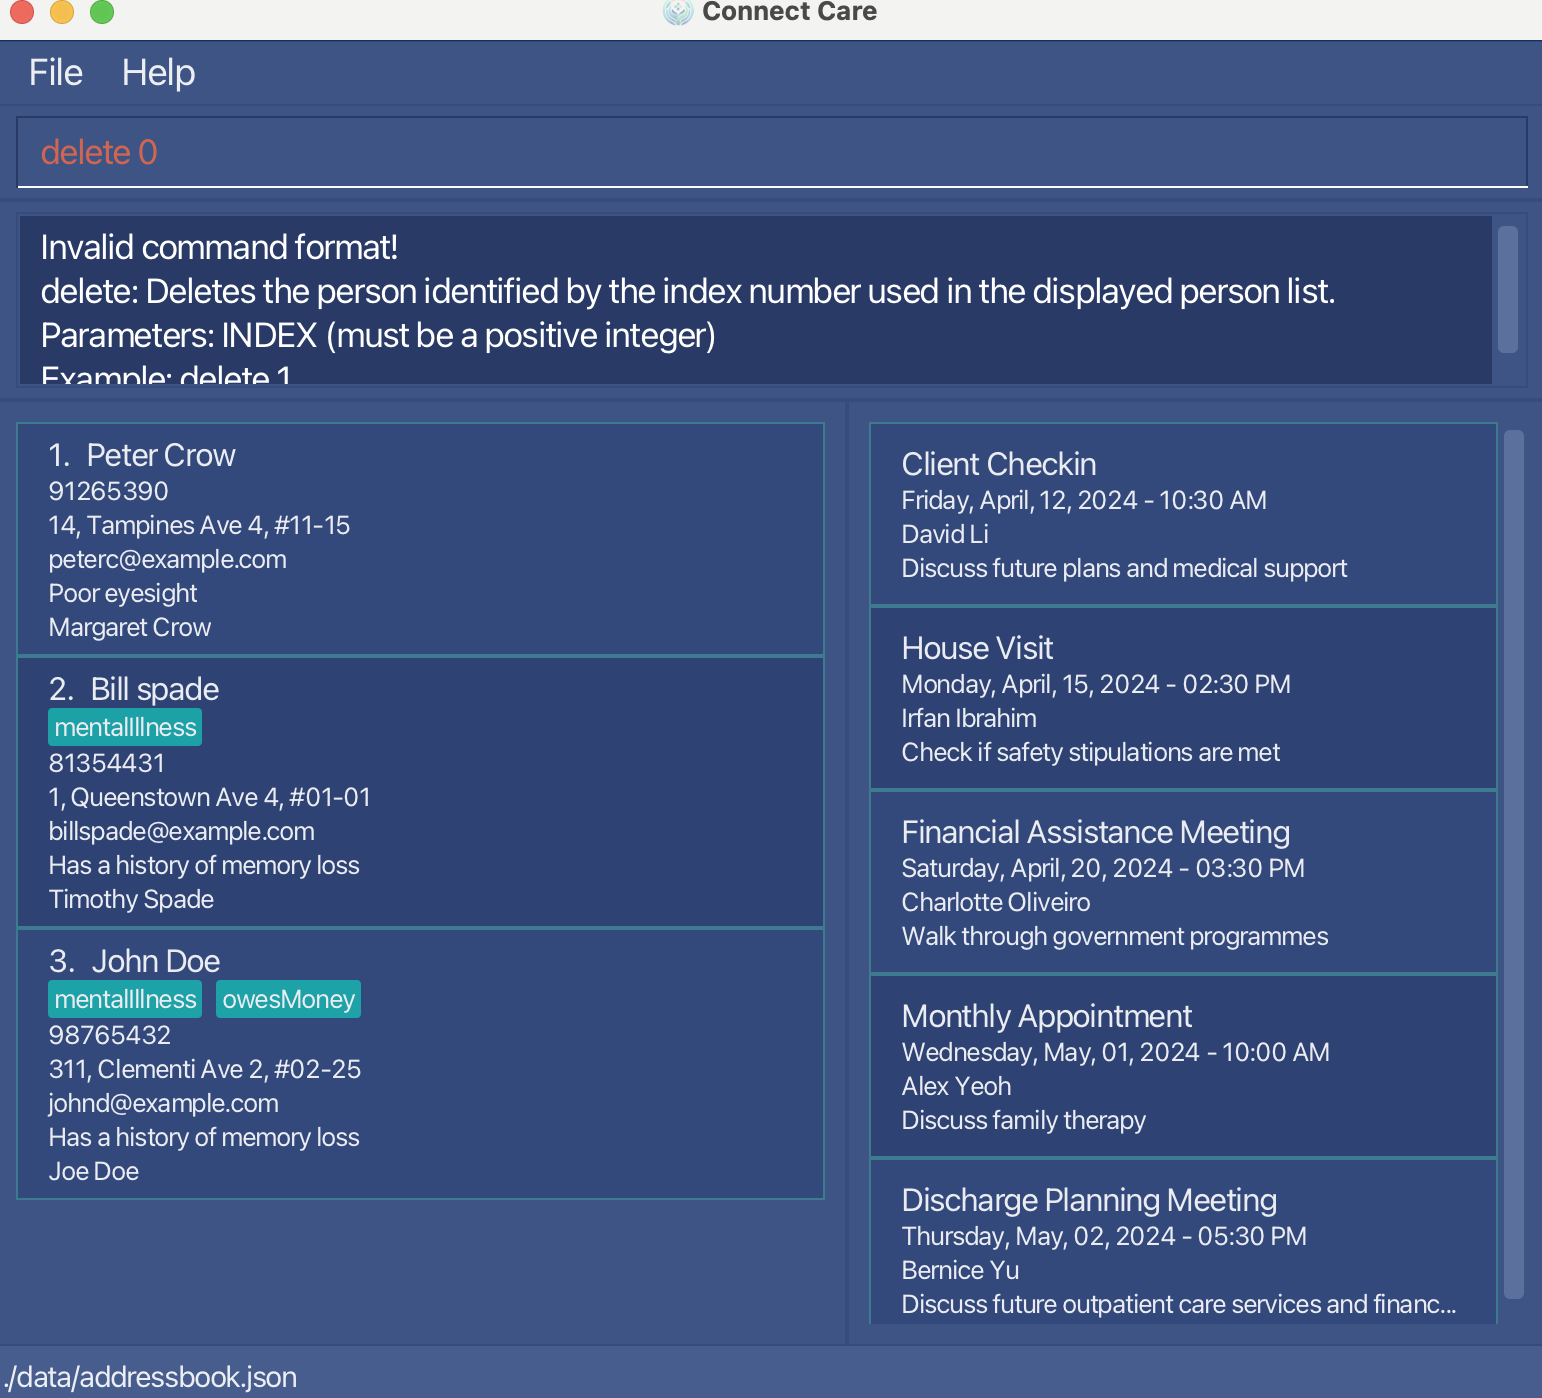
Figure 1.3: After the invalid delete 0 command is executed
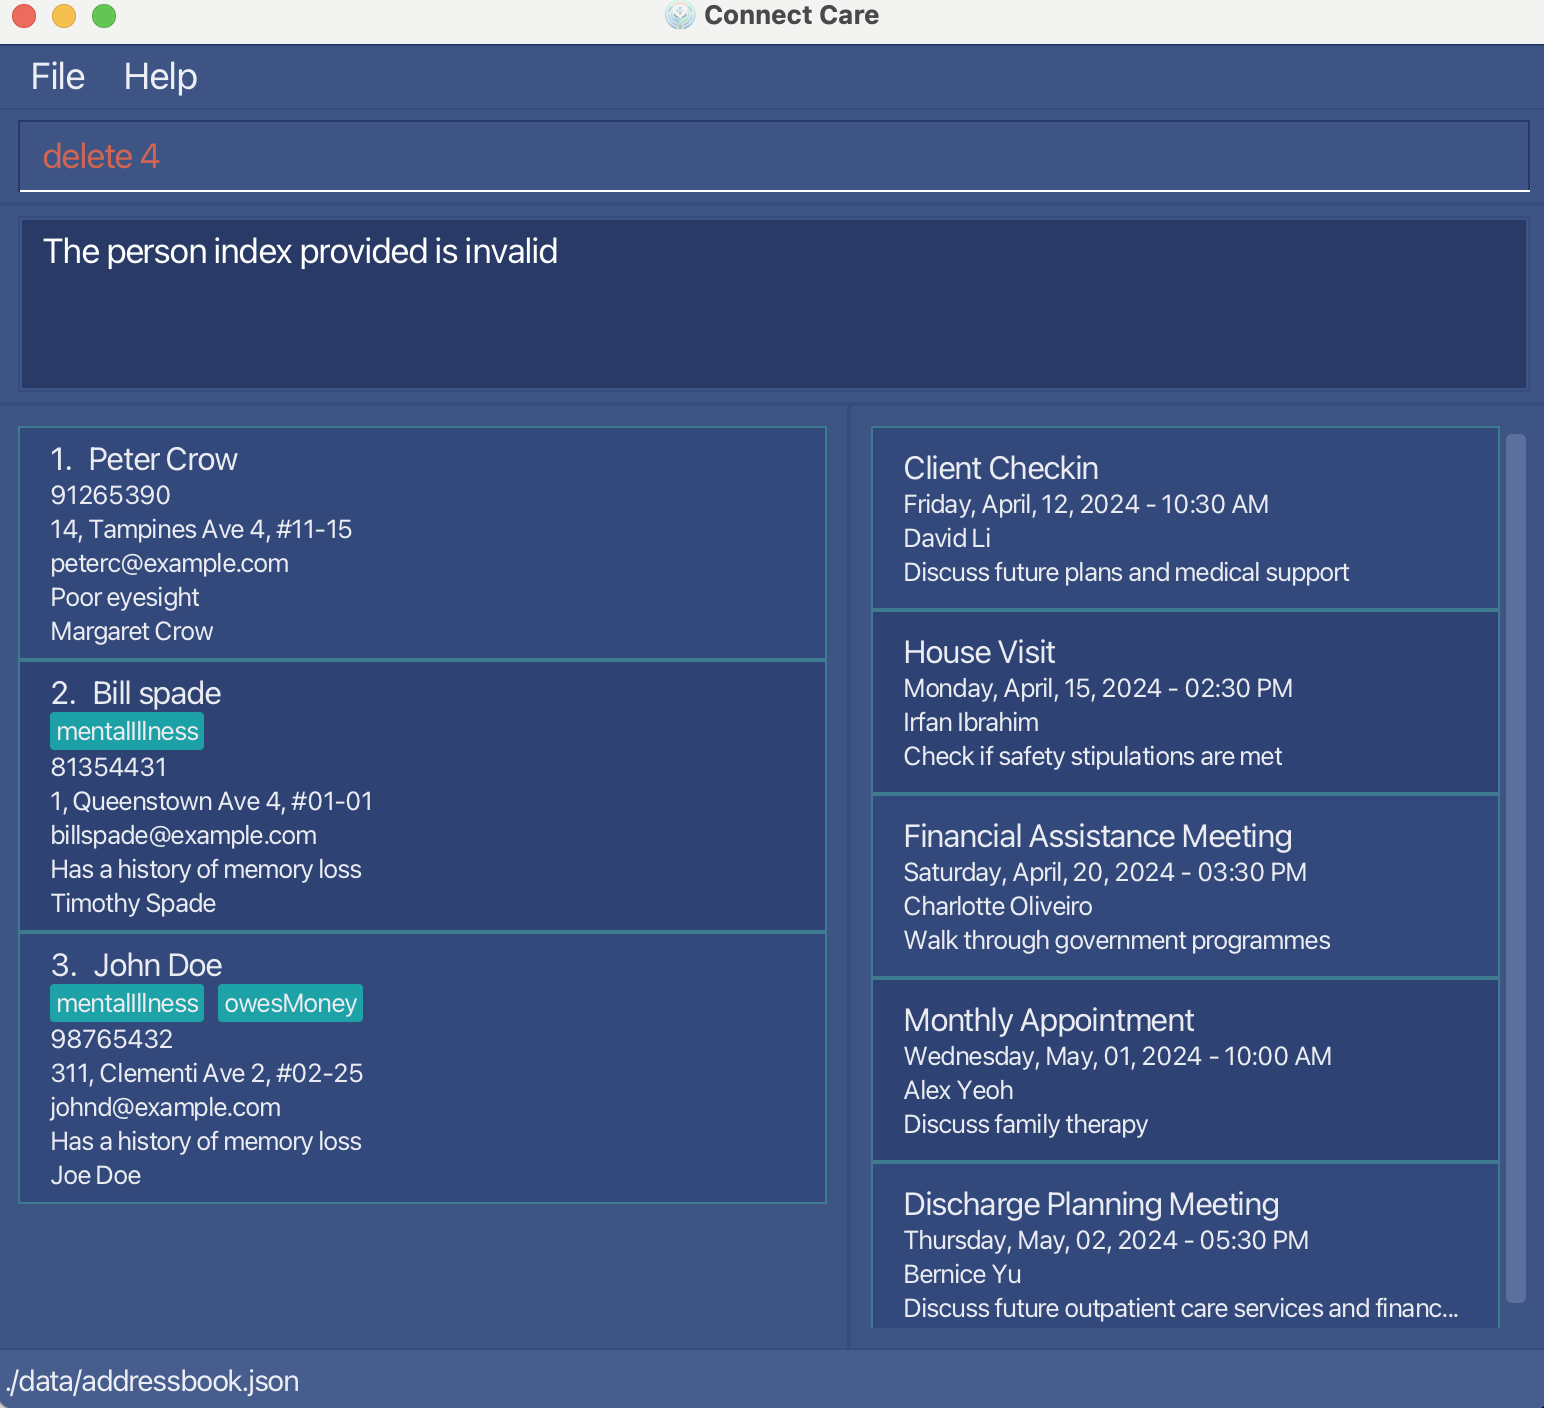
Figure 1.4: After the invalid delete 4 command is executed
Click here to return to the table of contents!
Updating a client: update
This command helps update existing client's information in the client list in the event that something changes.
Format: update u/EXISTING_USER [n/NAME] [p/PHONE_NUMBER] [e/EMAIL] [a/ADDRESS] [d/DESCRIPTION] [k/NEXTOFKIN] [t/TAG]…
Note: At least one optional parameter has to be given.
Example:
update u/Jane Doe n/John Doe p/98765432 e/johnd@example.com a/John street, block 123, #01-011This command updates Jane Doe's information to be as follows:
- name: John Doe
- phone no: 98765432
- email: johnd@example.com
- address: John street, block 123, #01-011
Walkthrough:
The screenshots below are what you would expect when using the update command. In this example, after using the list command,
the full clients list is displayed. Thereafter, the update command was used, using the parameters u/Peter Crow p/94325412 e/petercrow@example.com.
After execution, the client Peter Crow is updated successfully with the corresponding parameters!
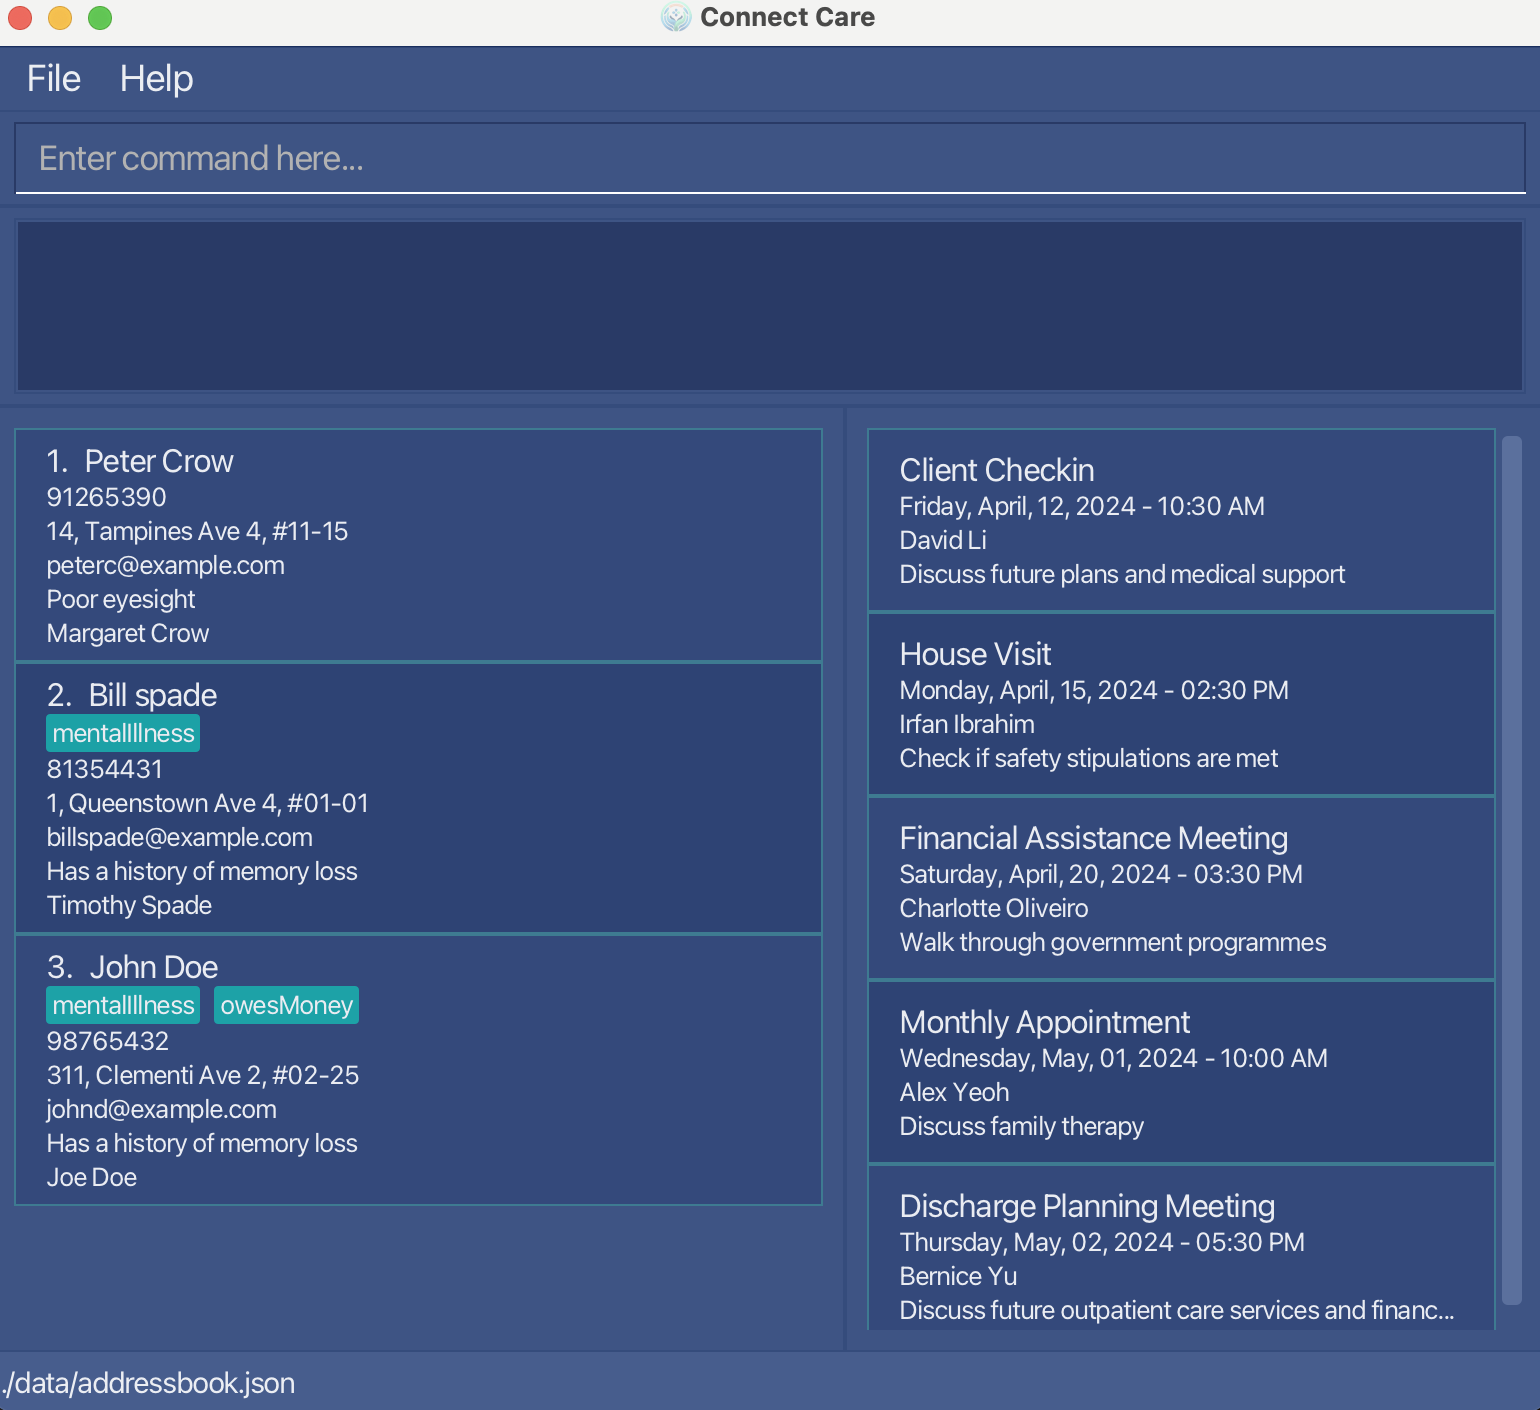
Figure 1.1: Before the `update command is executed
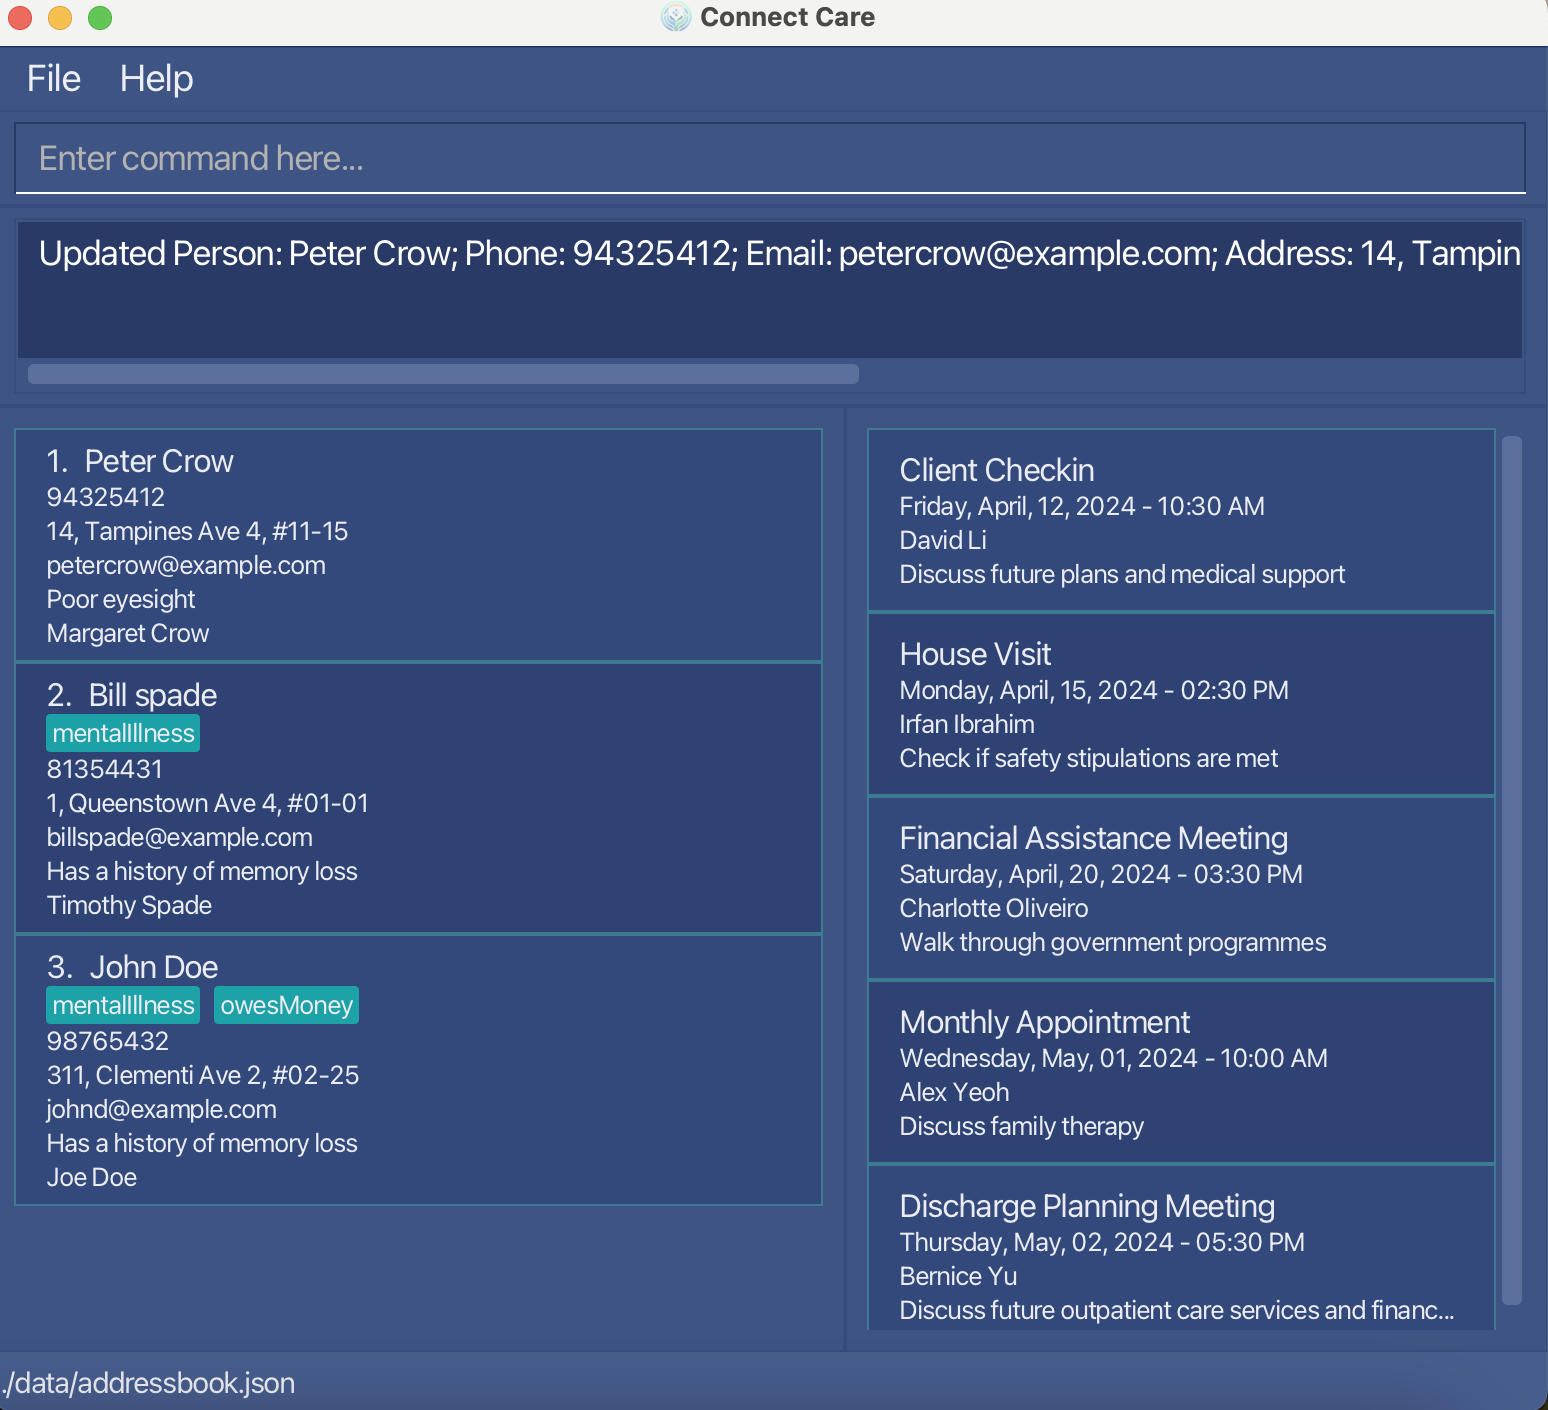
Figure 1.2: After the update command is executed
What if the command was used with invalid parameters? In the example on the left, the command update u/Unknown Person p/92374832 was used, which specifies a name not in the name list.
Here the error message shown is The person name provided is invalid which lets you know that you are trying to update a client that does not exist.
In the example on the right, the command update u/Peter Crow p/abc123 is used, which again is invalid. Here the error message shown is Phone numbers should only contain numbers, and it should be at least 3 digits long which lets you know specifically that the phone number given was invalid.
As the commands given were invalid, there would be no changes to the client list.
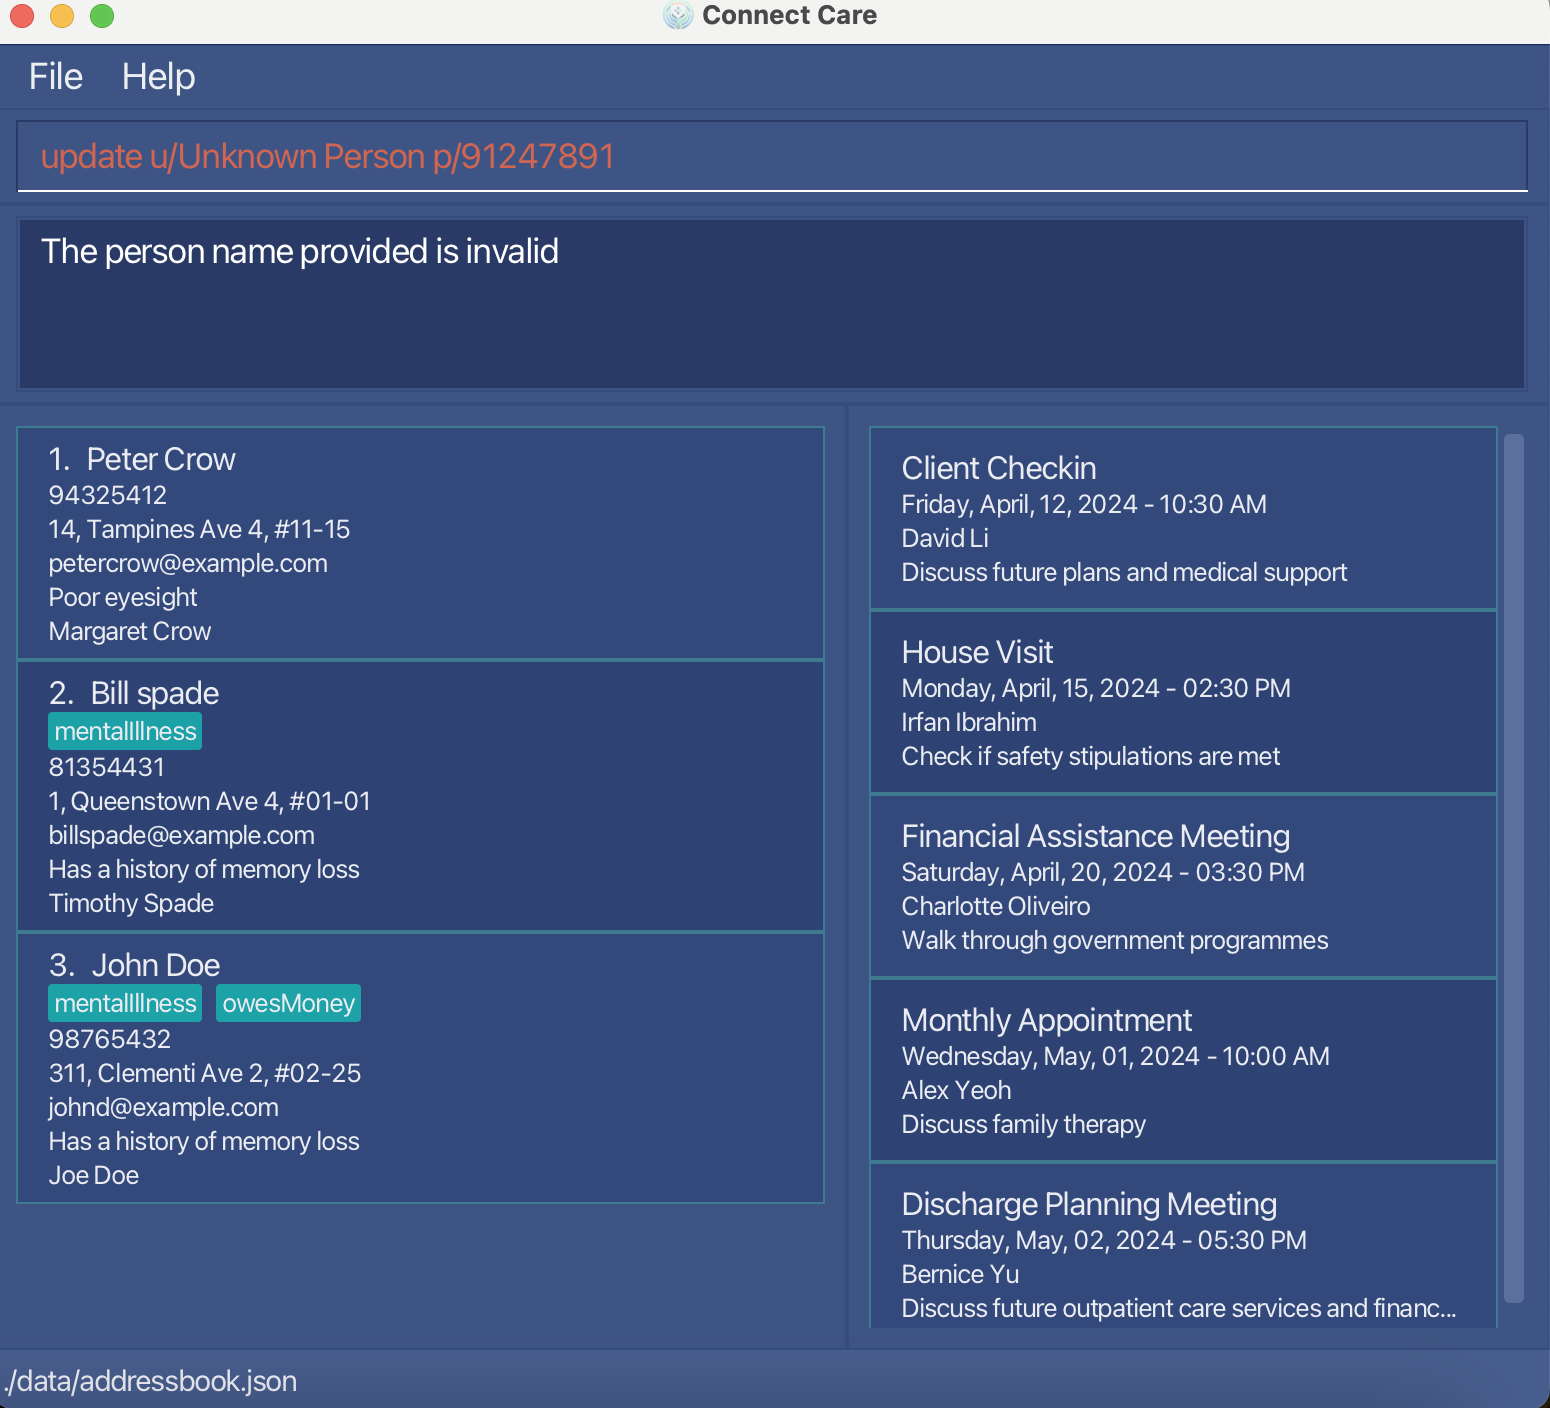
Figure 1.3: After the invalid update command with an invalid client is executed
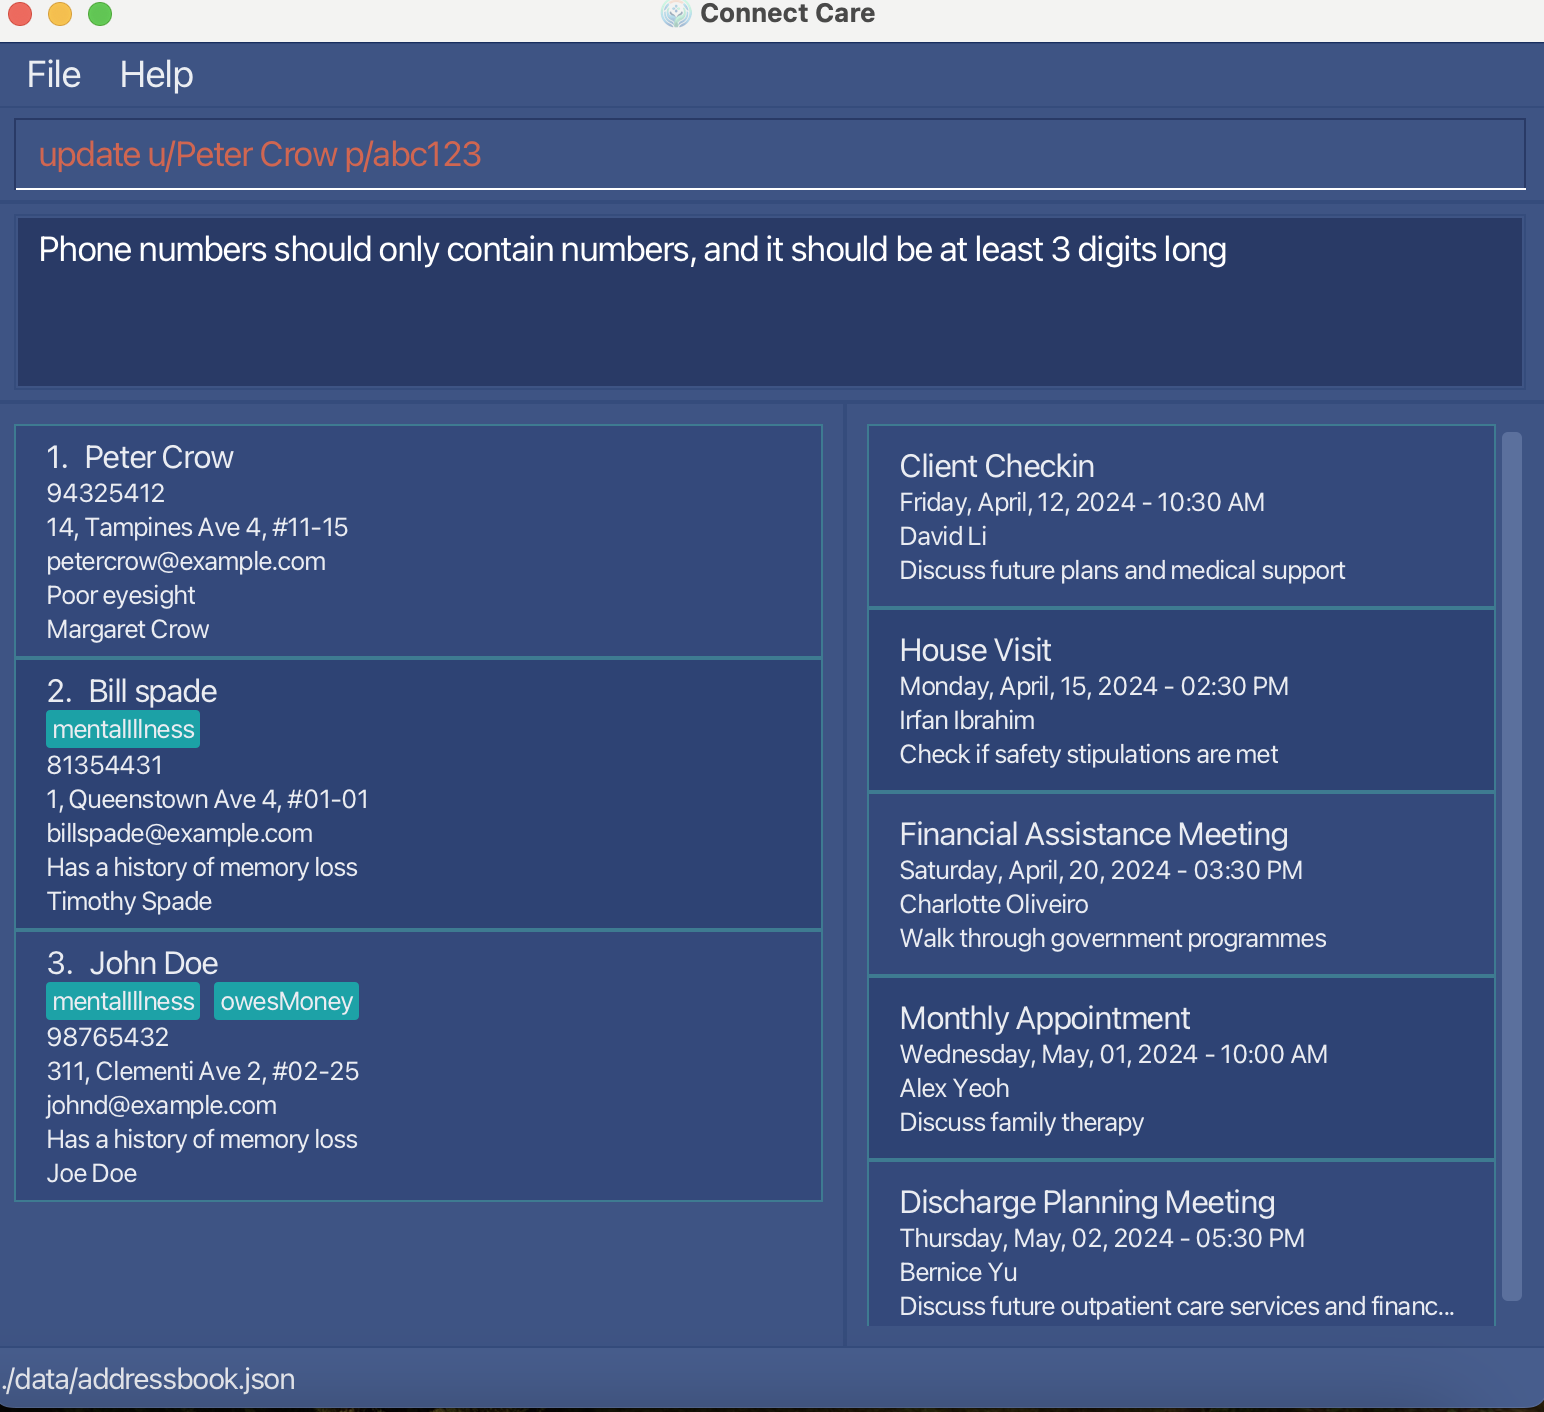
Figure 1.4: After the invalid update command with invalid parameters is executed
Click here to return to the table of contents!
Listing all clients: list
This command shows a list of all persons.
Format: list
Examples:
The screenshots below are what you would expect when using the list command. In this example, after using the find command,
only Peter Crow was shown in the list. Thereafter, the list command was used, displaying the entire list of client contacts.
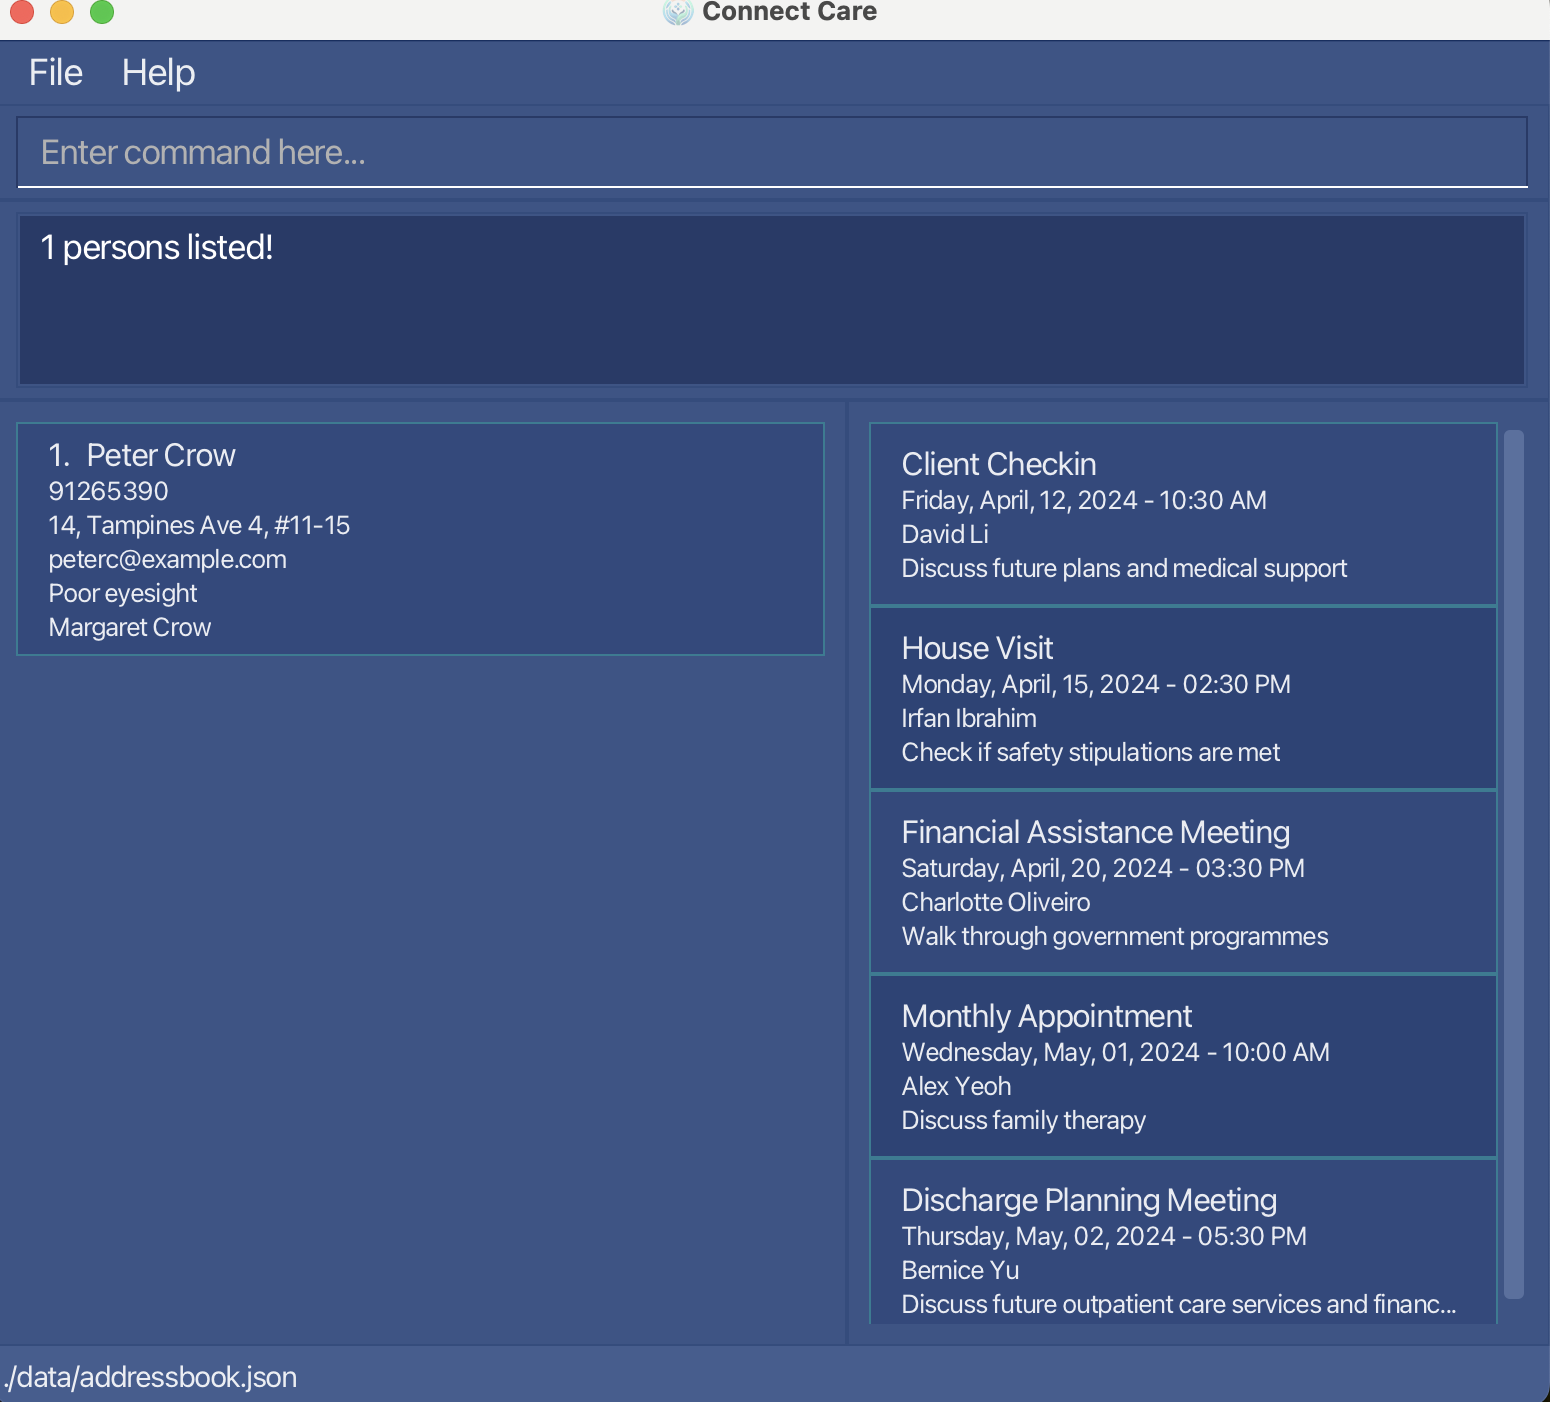 Figure 1.1: Before the list command is executed
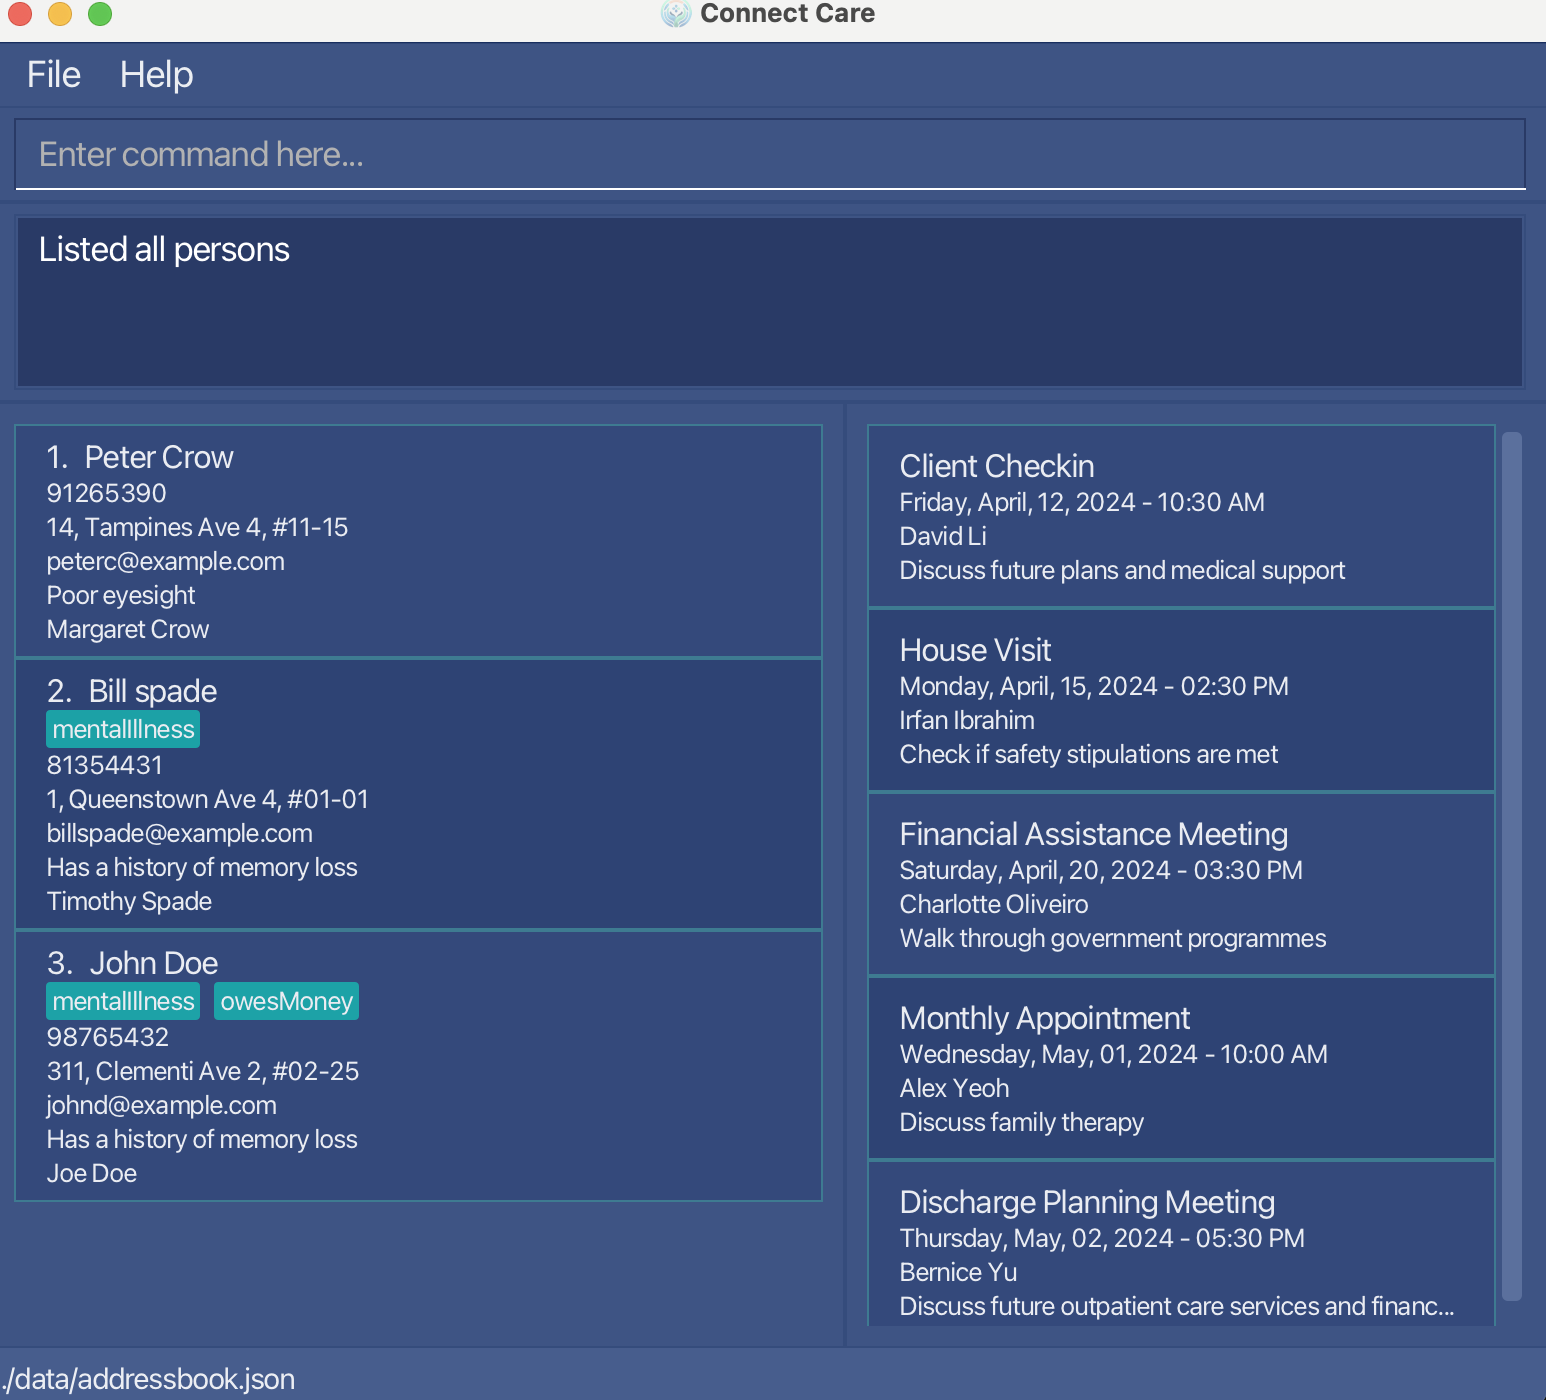 Figure 1.2: After the list command is executed
Click here to return to the table of contents!
Finding clients: find
This command allows you to find clients in your client list by specifying client parameters that you are interested in.
Format: find [n/NAME]… [a/KEYWORD]… [e/KEYWORD]… [t/KEYWORD]… [k/KEYWORD]… [d/KEYWORD]… [p/KEYWORD]…
Note: At least one optional parameter has to be given.
Note: This command finds clients that match any of your search terms.
Example:
find p/99824412find n/xavier k/pollyfind n/bobby
Walkthrough:
Let's say your client list contains the following clients:
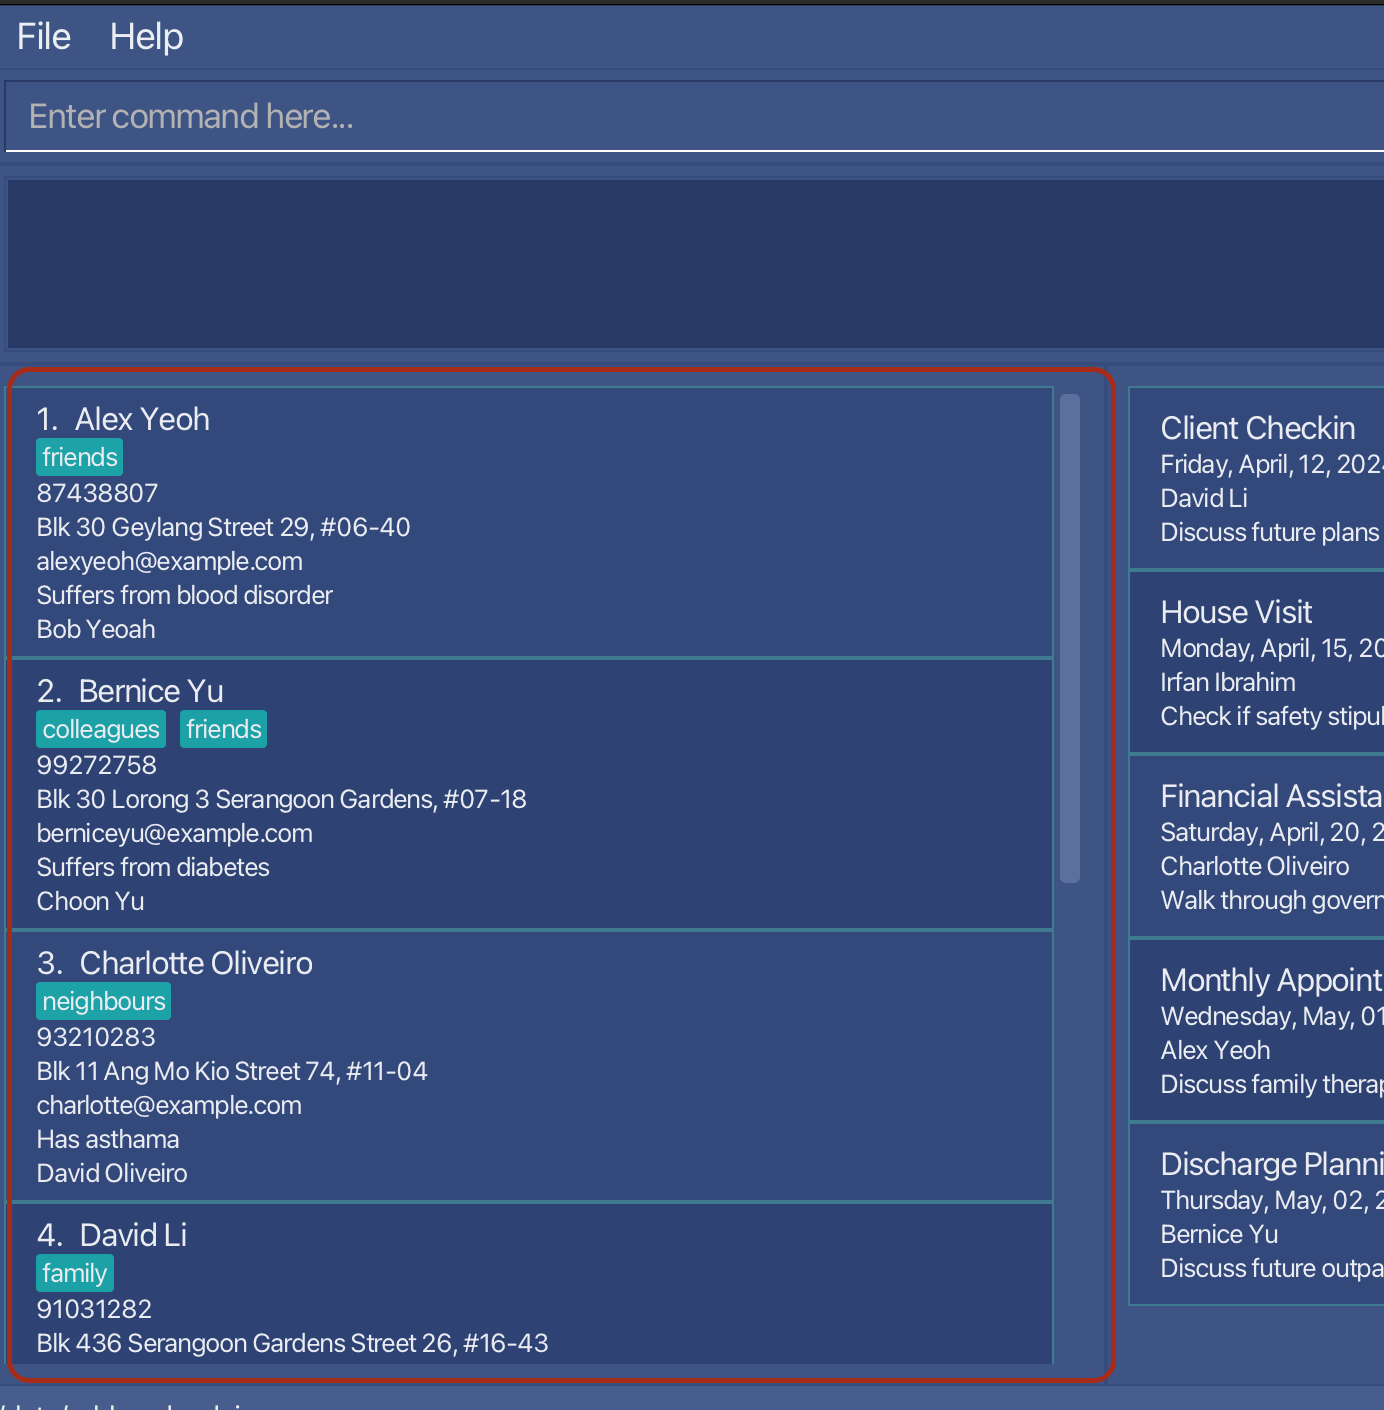
Figure 1.1: An example client list in ConnectCare (as indicated by the red box)
find n/alexwould returnAlex Yeohas the client name matches withalex.find n/alex p/99272758would returnAlex Yeohas the client name matches withalexas well asBernice Yuas the client phone number matches with99272758.find p/9would returnBernice Yu,Charlotte OliveiroandDavid Lias their phone numbers all start with9.
Note: you can search for multiple keywords, for example find n/name1 n/name2 would search for all clients with names that contain name1 OR name2
This also applies to the optional keywords, for example `find n/name1 a/address1 a/address2 would search for all clients with names that contain name1 AND
have an address that contains address1 OR address2, for example:
find n/alex n/bernicewould returnAlex Yeohas well asBernice Yufind t/friends t/familywould returnAlex Yeoh,Bernice Yu, andDavid Li
Tip:
After searching for clients, you can use the list command to view your full list of clients again!
Click here to return to the table of contents!
Displaying a client's information: display
This command allows you to view a client's information in a more detailed manner
Format: display NAME
Examples:
display Peter Crouch would display all of Peter's information as a contact card on the application.
Walkthrough:
The screenshots below are what you would expect when using the display command. In this example, after using the list command,
the full clients list is displayed. Thereafter, the display Peter Crouch command was used, displaying Peter. The cursor automatically moves
to the description box, allowing you to make changes to Peter's details. After making the necessary changes, hit enter. The details will be updated
and you will be redirected back to the home page with the clients list. At no stage do you need to reach for the mouse!
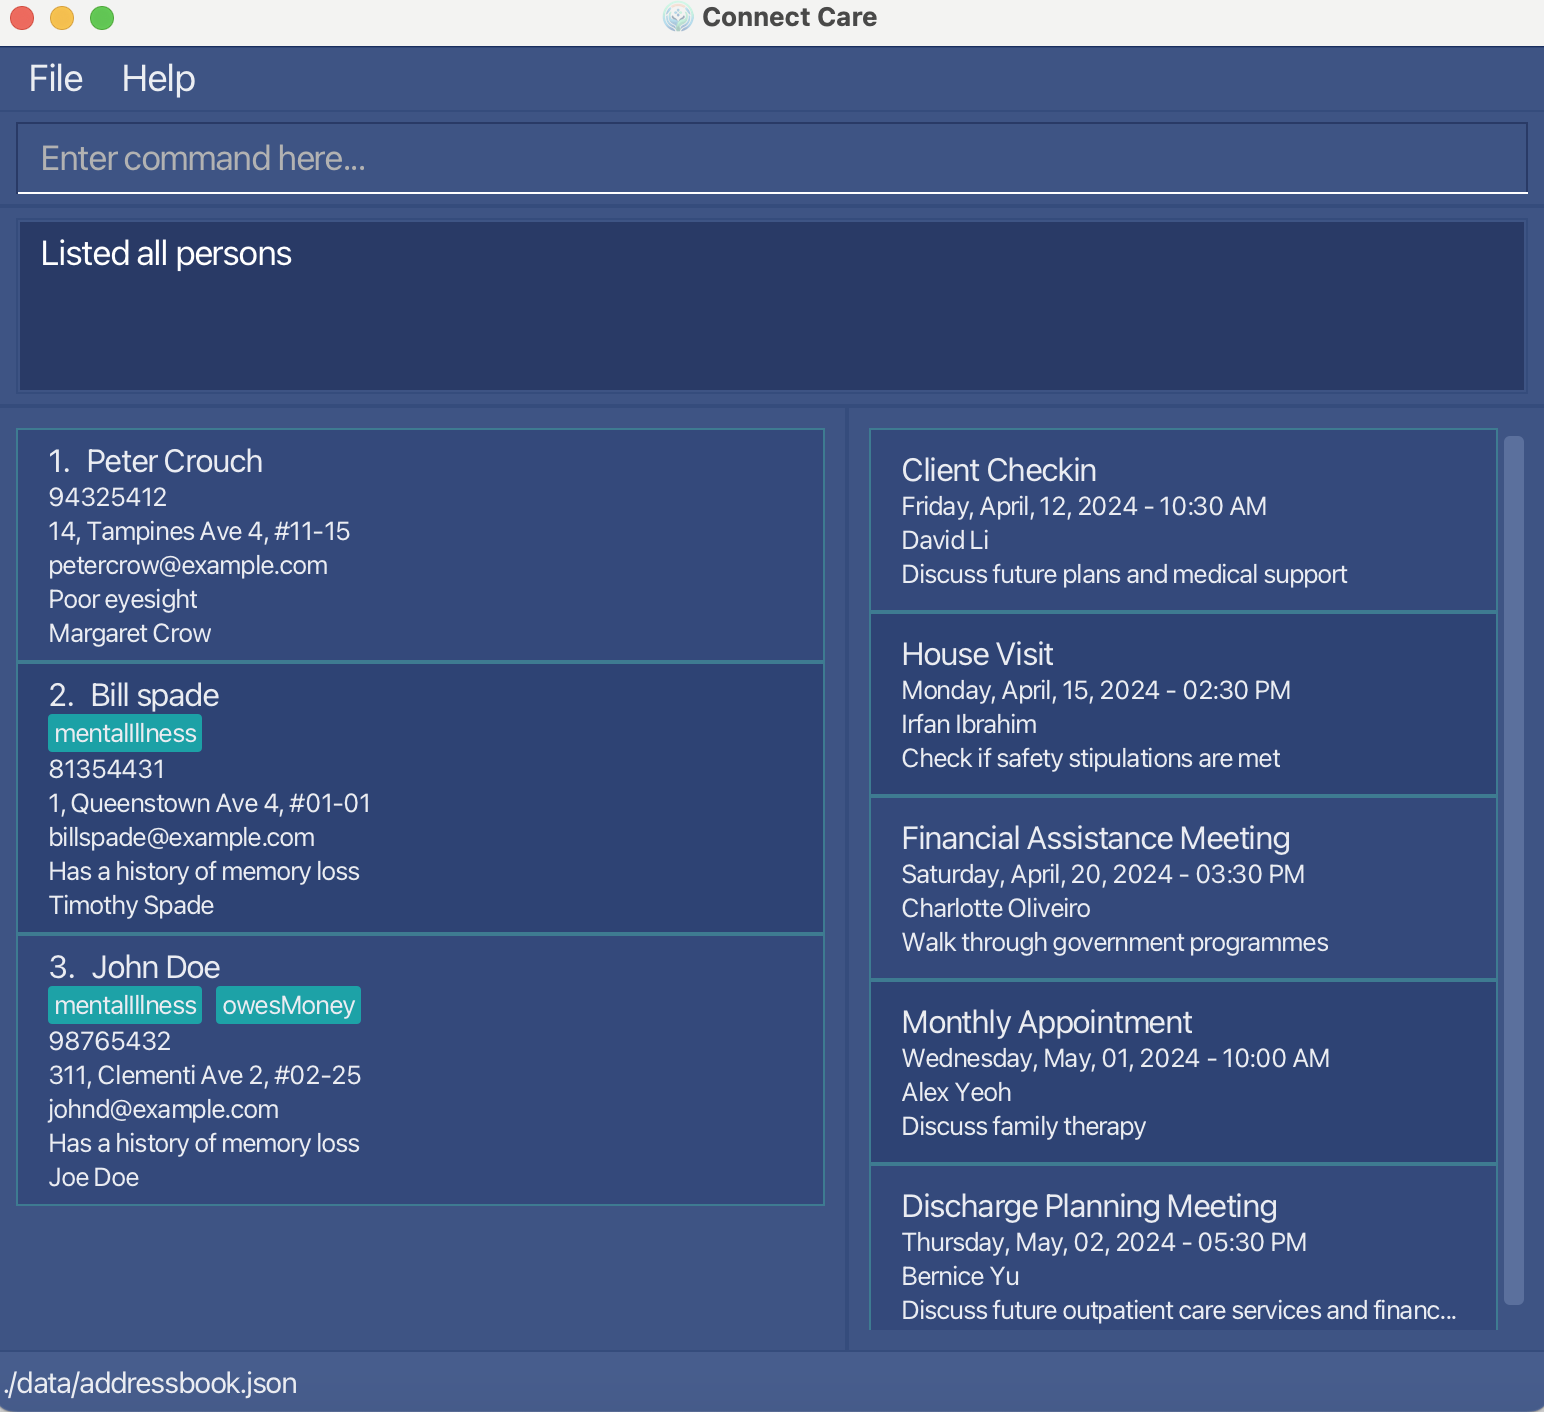 Figure 1.1: Before the display command is executed
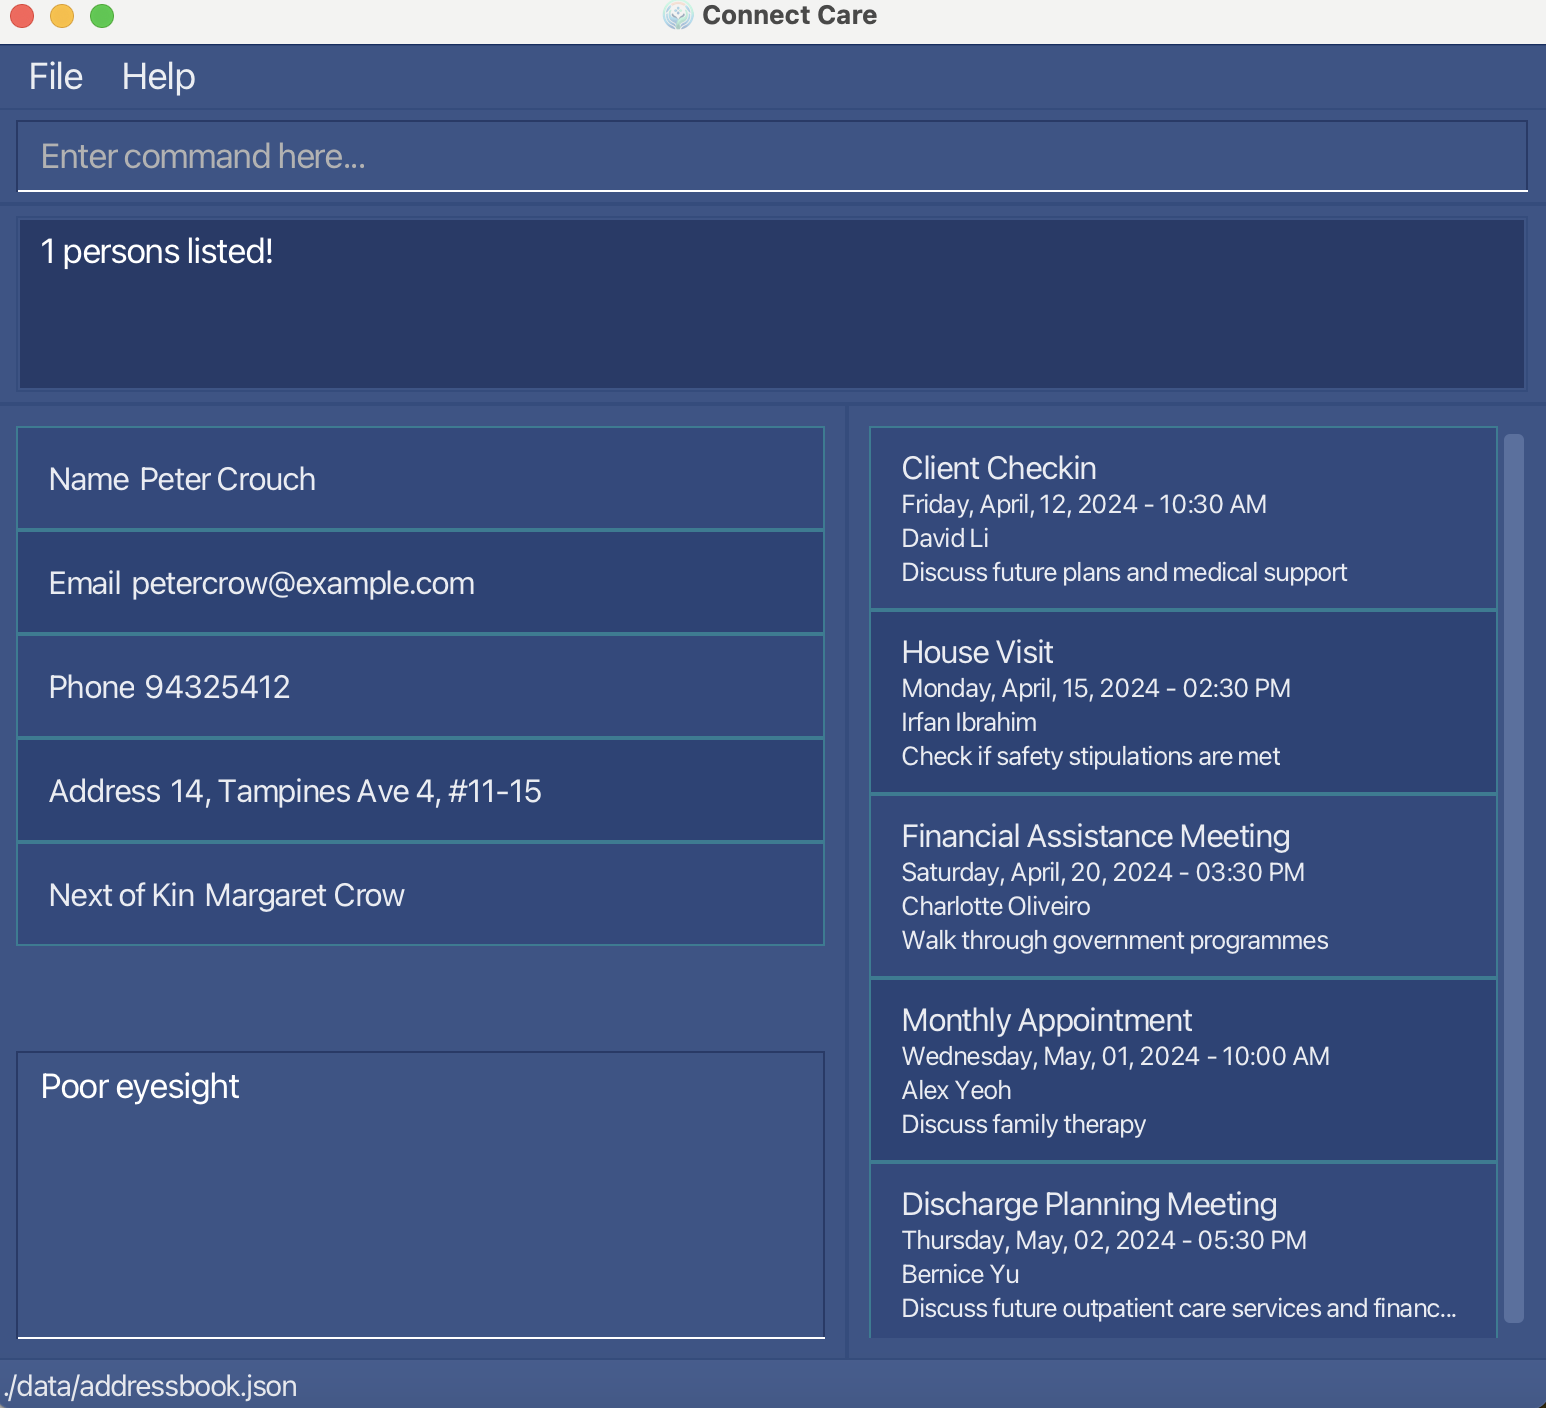 Figure 1.2: After the display command is executed
Caution: While you are in the display view, you cannot enter any commands in the command box other than the list command which will swap you back into the list view. Any changes you make to description by reverting to the list view using this method would not be saved. Alternatively, you can the press ENTER key and the undo command to revert the changes. If you would like to resume entering commands, press the ENTER key in the description box (which will save your changes) to return to the list view.
Click here to return to the table of contents!
Clearing all entries : clear
This command allows you to purge your client list, removing ALL clients in your client list.
Format: clear
Tip:
Accidentally cleared your client list? Worry not, the undo feature might be able to help you get it back!
Click here to return to the table of contents!
You are now an expert in managing your clients! Now that we are done with the Client management features let's move on to the Appointment management features!
Appointment Management
ConnectCare provides the following commands to help you manage your appointments:
- Adding an appointment:
schedule add - Deleting an appointment:
schedule delete
Adding an appointment: schedule add
This command allows you to add an appointment with the specified parameters.
Format: schedule add h/HEADING t/TIME d/DESCRIPTION n/CLIENT_NAME
Once the command is entered, the event should be added to the events panel on the right of the application.
Examples:
schedule add h/Meeting with Client t/2/14/2024 0930 d/Discuss project details n/John Doeschedule add h/Discharge plan meeting t/02/14/2024 1000 d/Discuss discharge n/Jack Doe
Walkthrough:
The screenshots show what you should expect on your screen while executing this command: schedule add h/Meeting with Client t/2/14/2024 0930 d/Discuss project details n/John Doe.
Once the command is entered, the event should be deleted on the events panel on the right of the application.
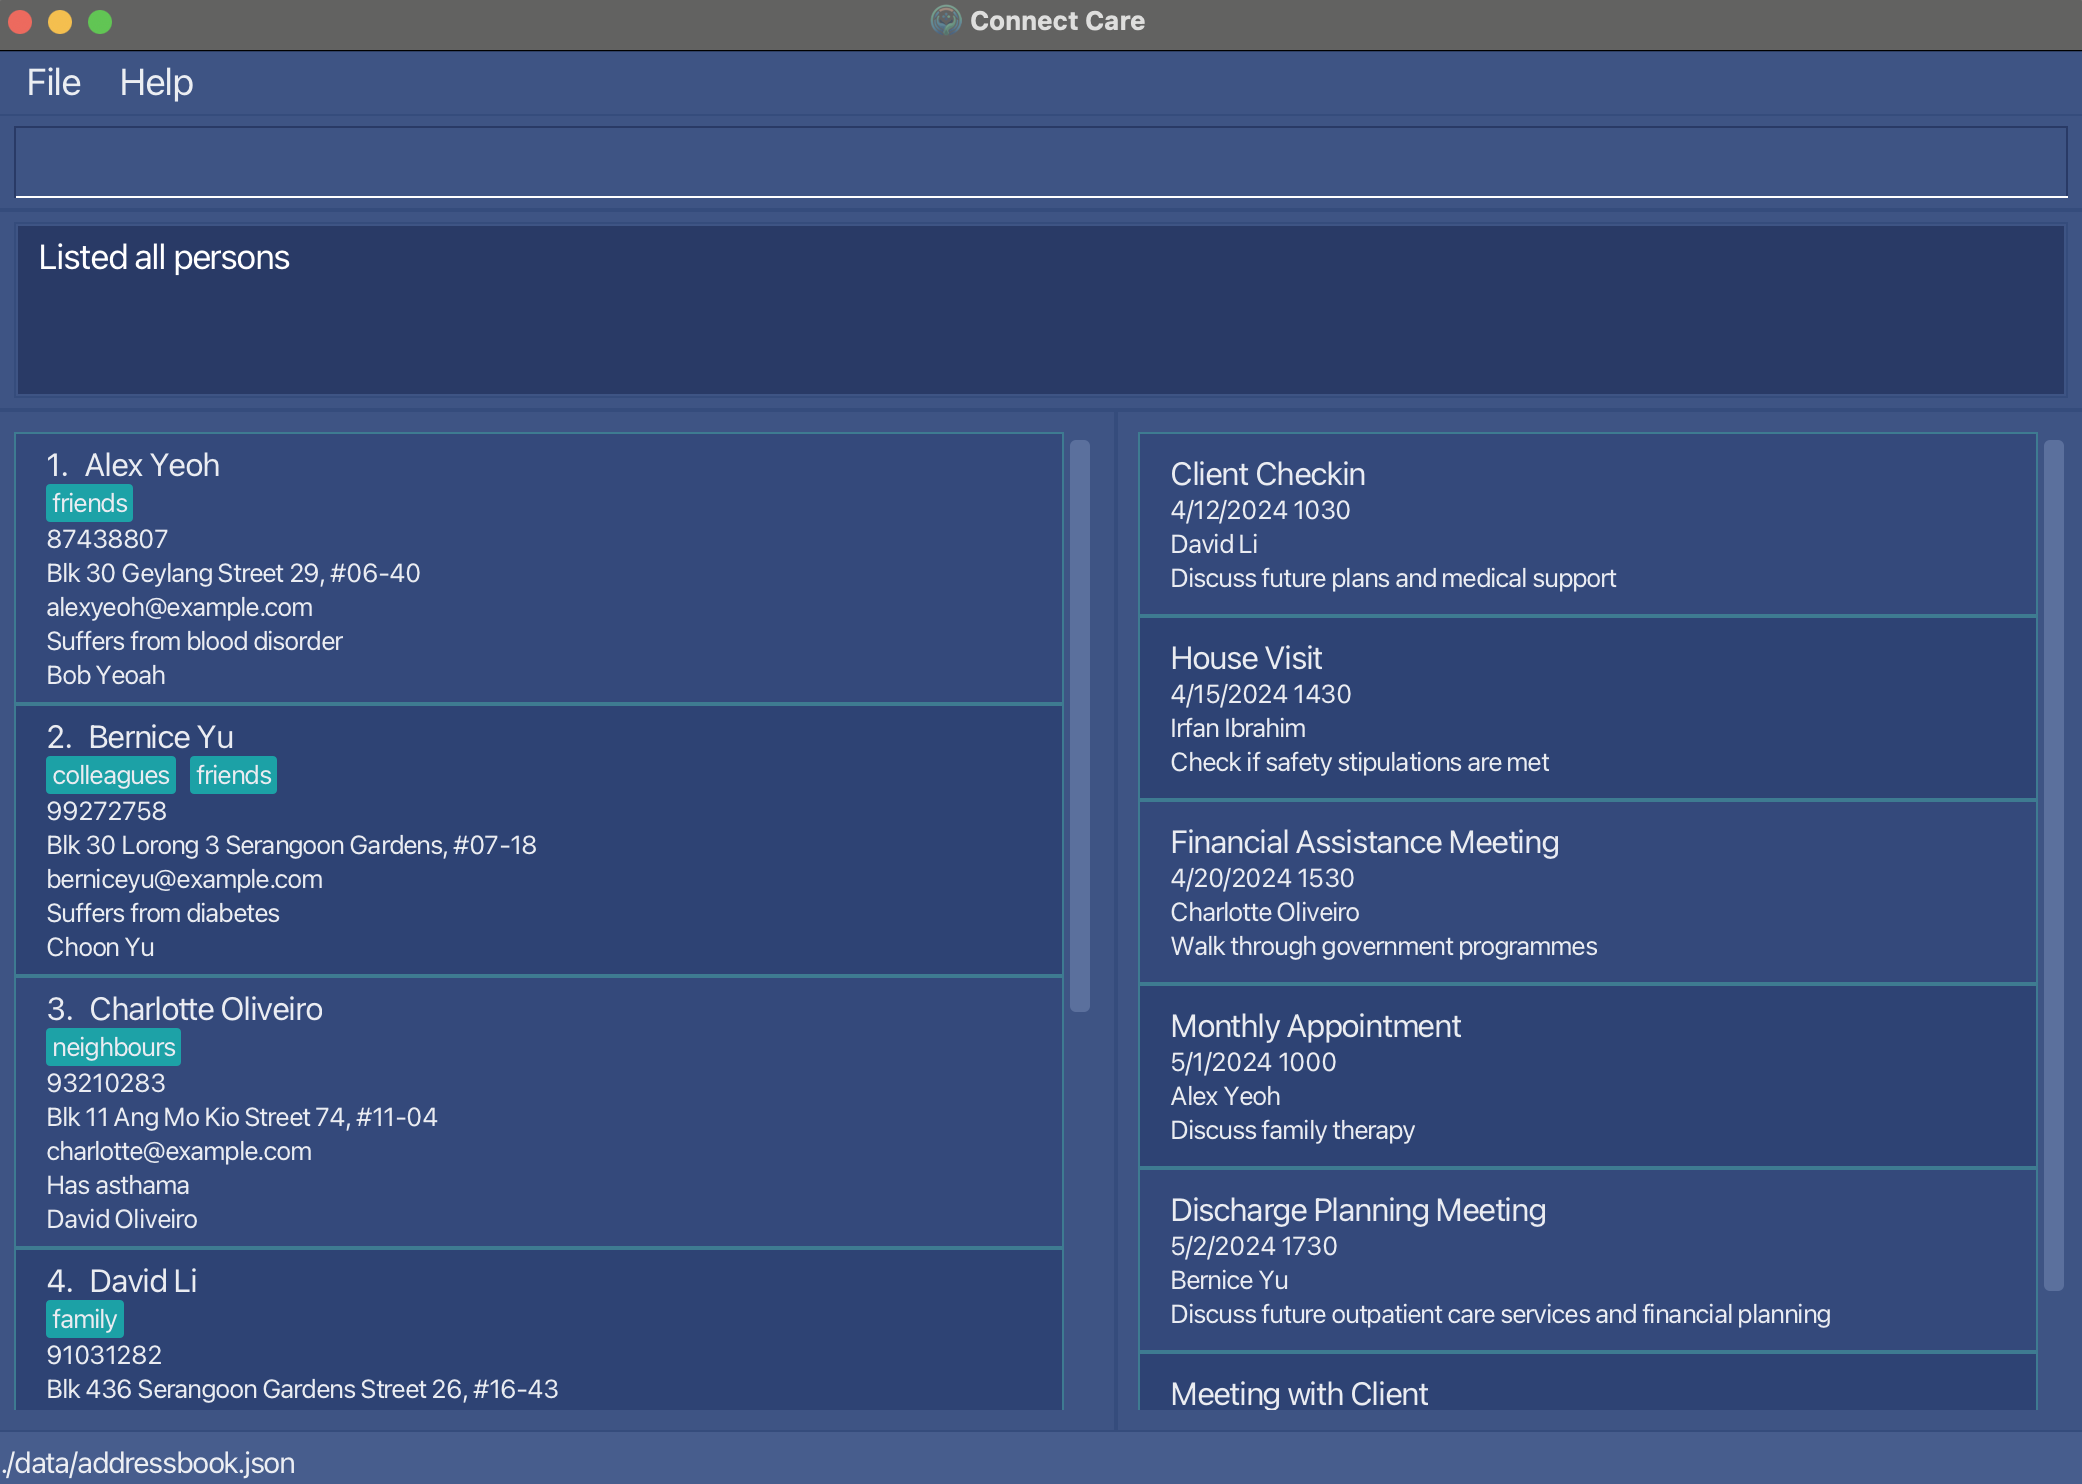
Figure 1.1: Before the schedule add command is executed
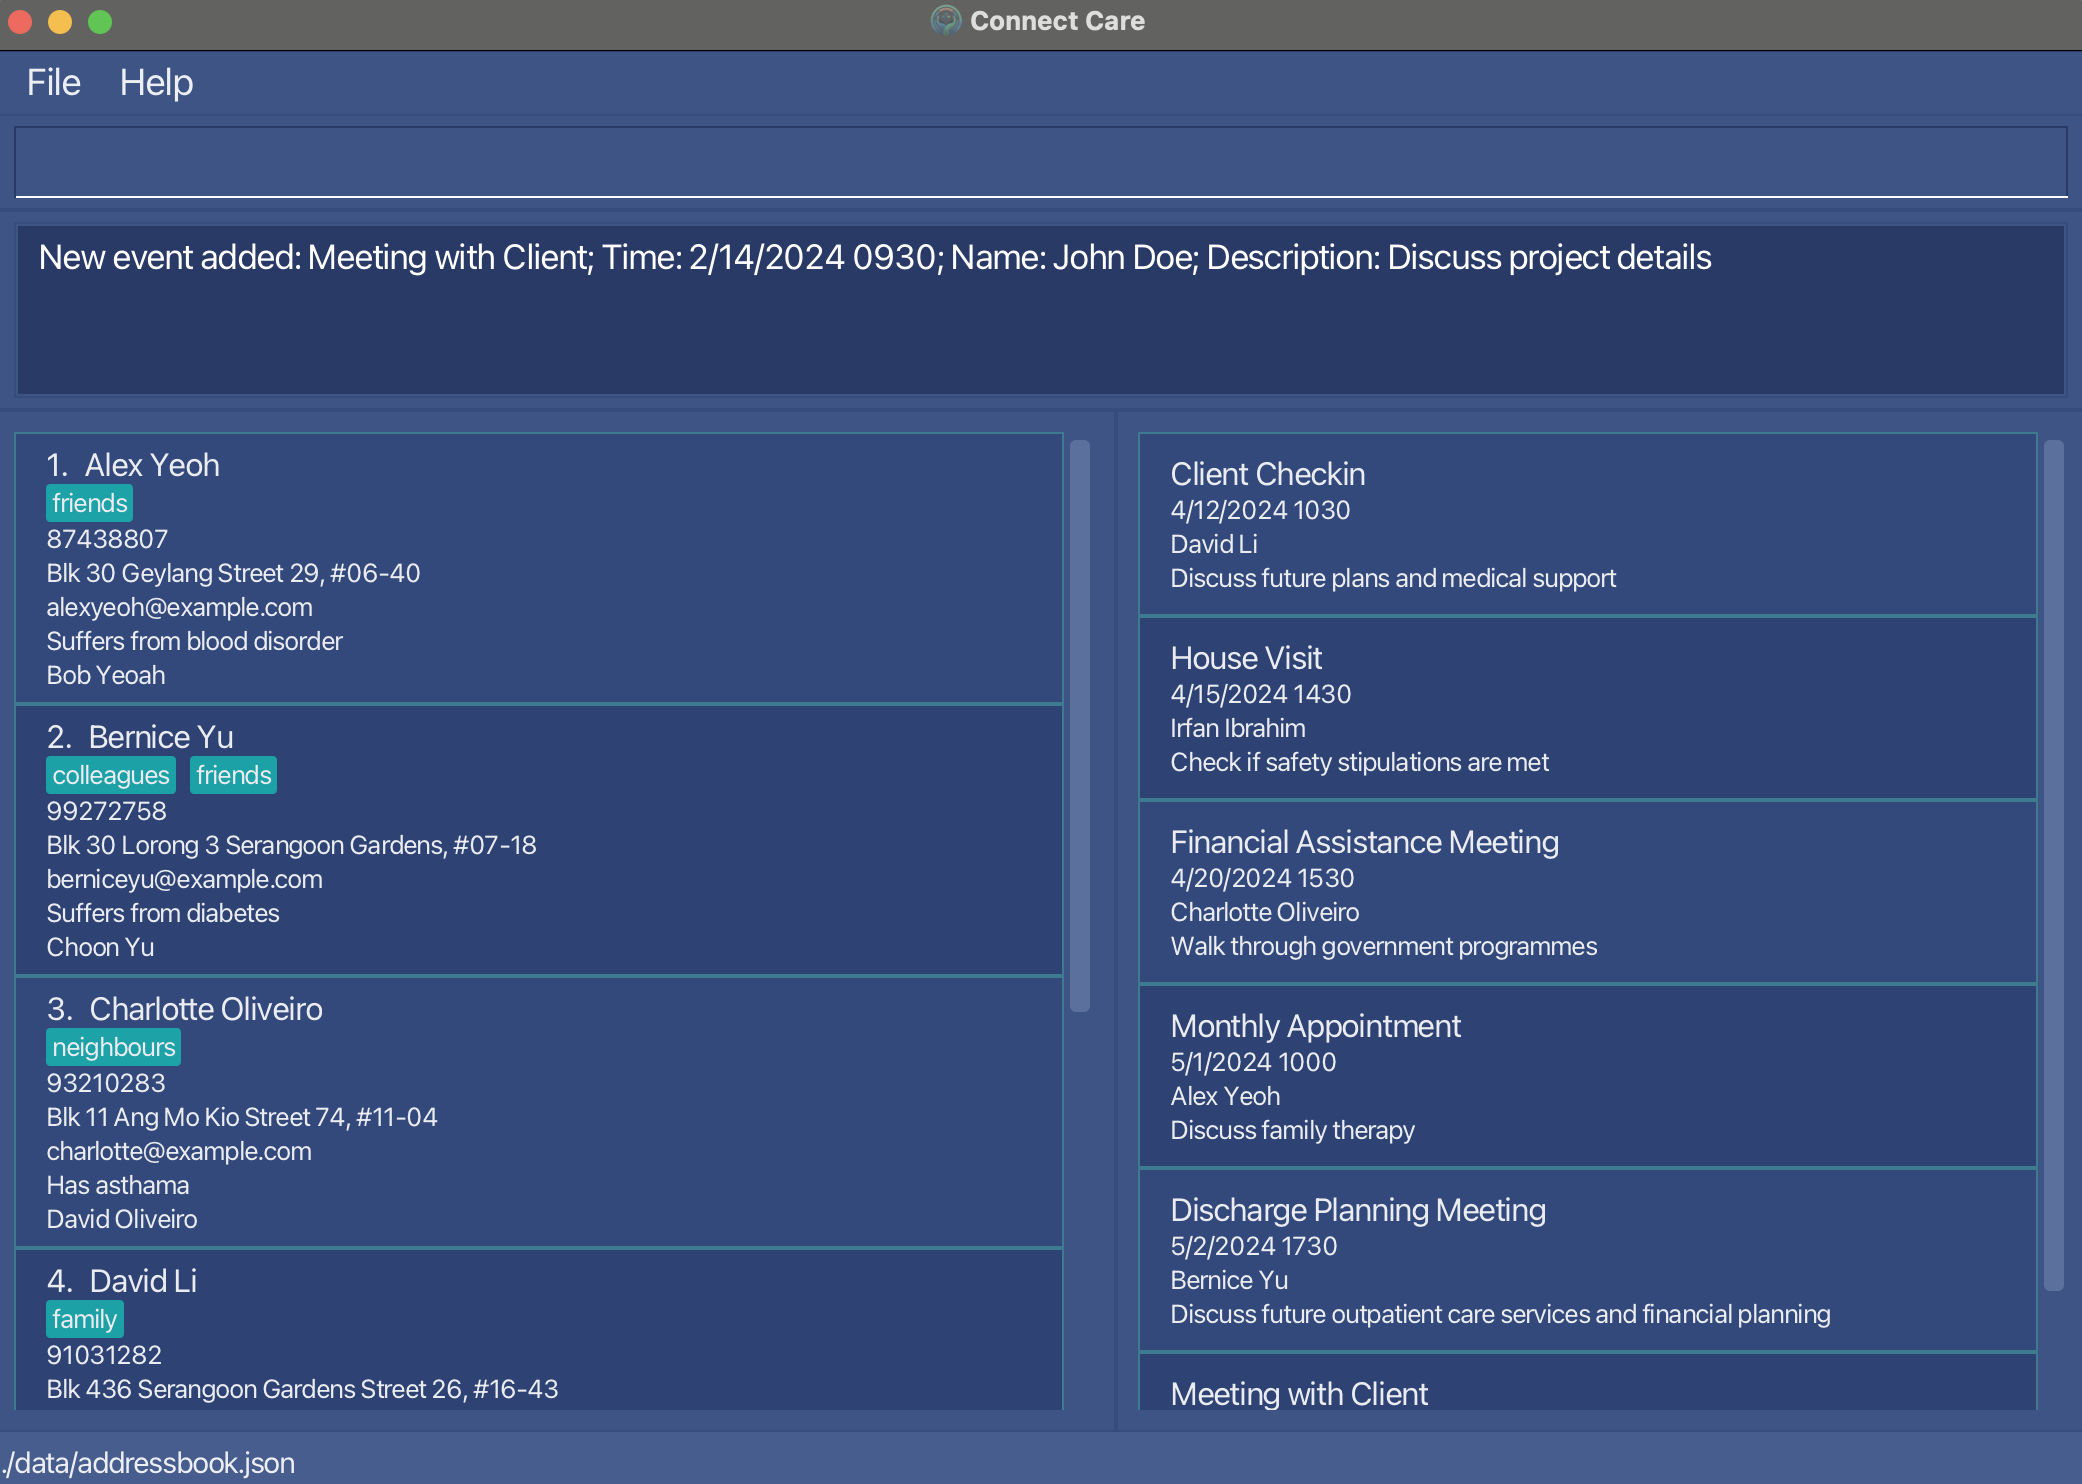
Figure 1.2: After the schedule add command is executed
Click here to return to the table of contents!
Deleting Appointment : schedule delete
This command allows you to remove an appointment with the specified parameters.
Format: schedule delete h/HEADING
Once the command is entered, the event should be removed from the events panel on the right of the application.
Tip: Make sure there are no extra spaces between words in the heading.
Examples:
schedule delete h/Meeting with Clientschedule delete h/Discharge plan meeting
Note: It is only possible to delete an event if the heading exists in the events panel on the right of the application.
Walkthrough:
The screenshots show what you should expect on your screen while executing this command: schedule delete h/Client Checkin.
Once the command is entered, the event should be added to the events panel on the right of the application.
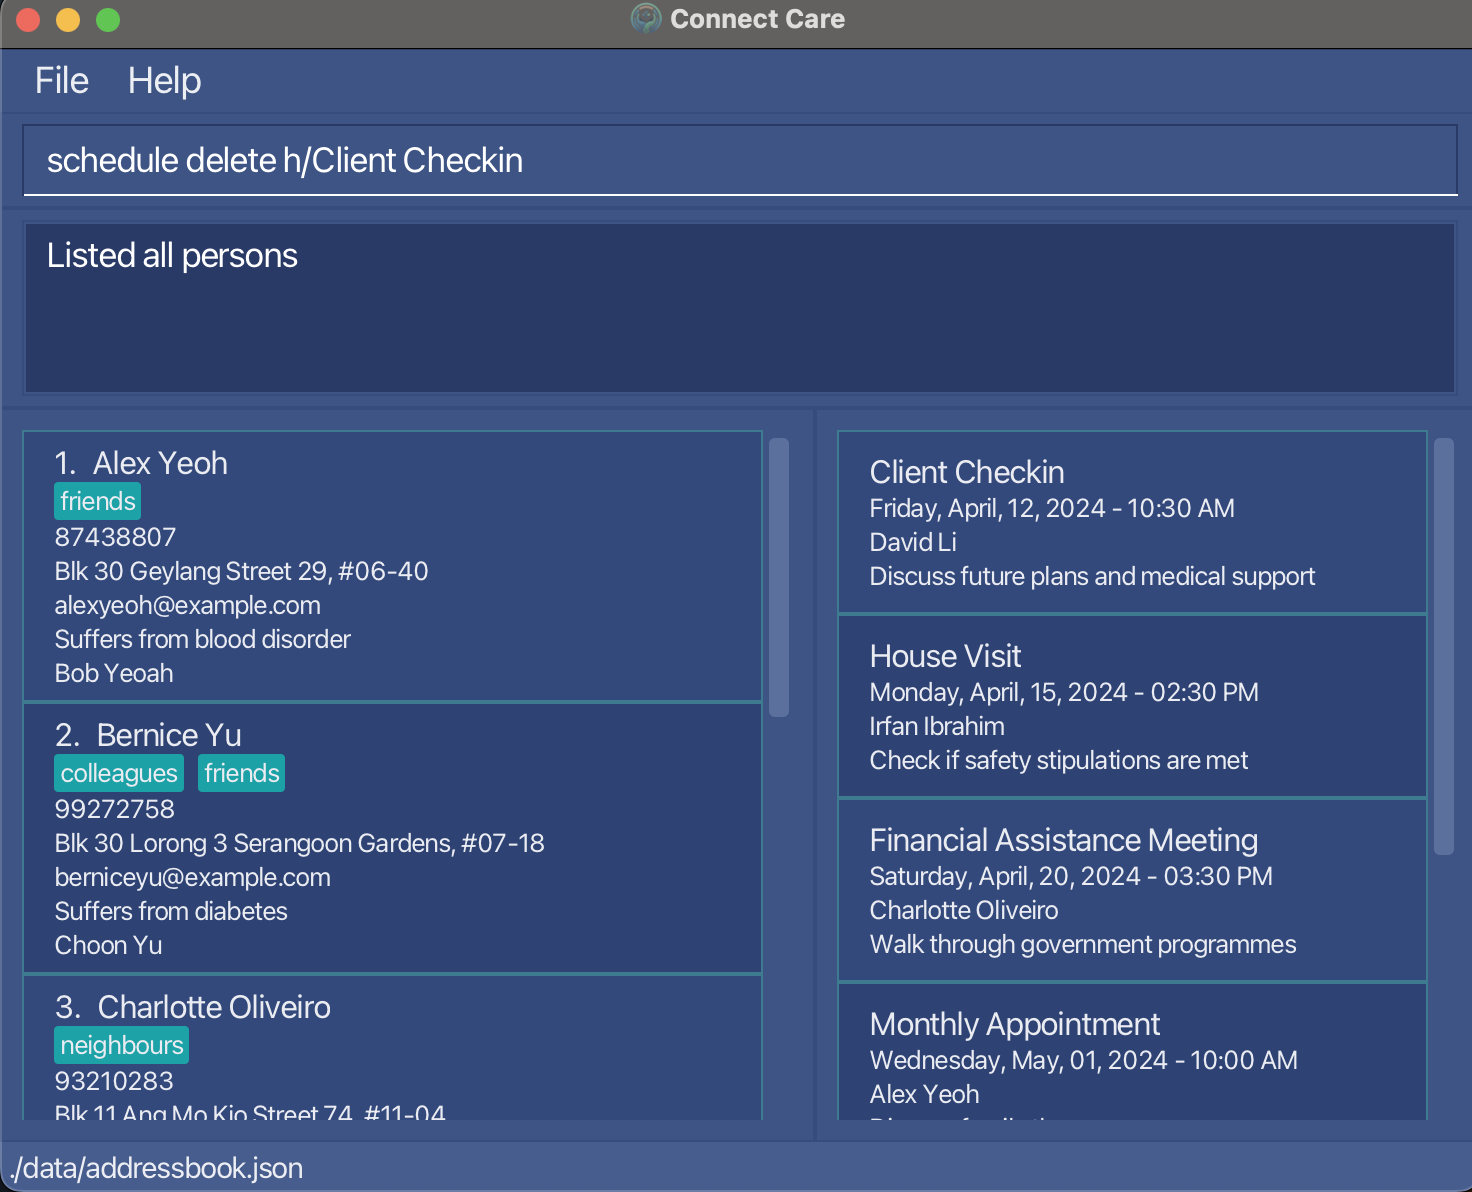
Figure 1.1: Before the schedule delete command is executed
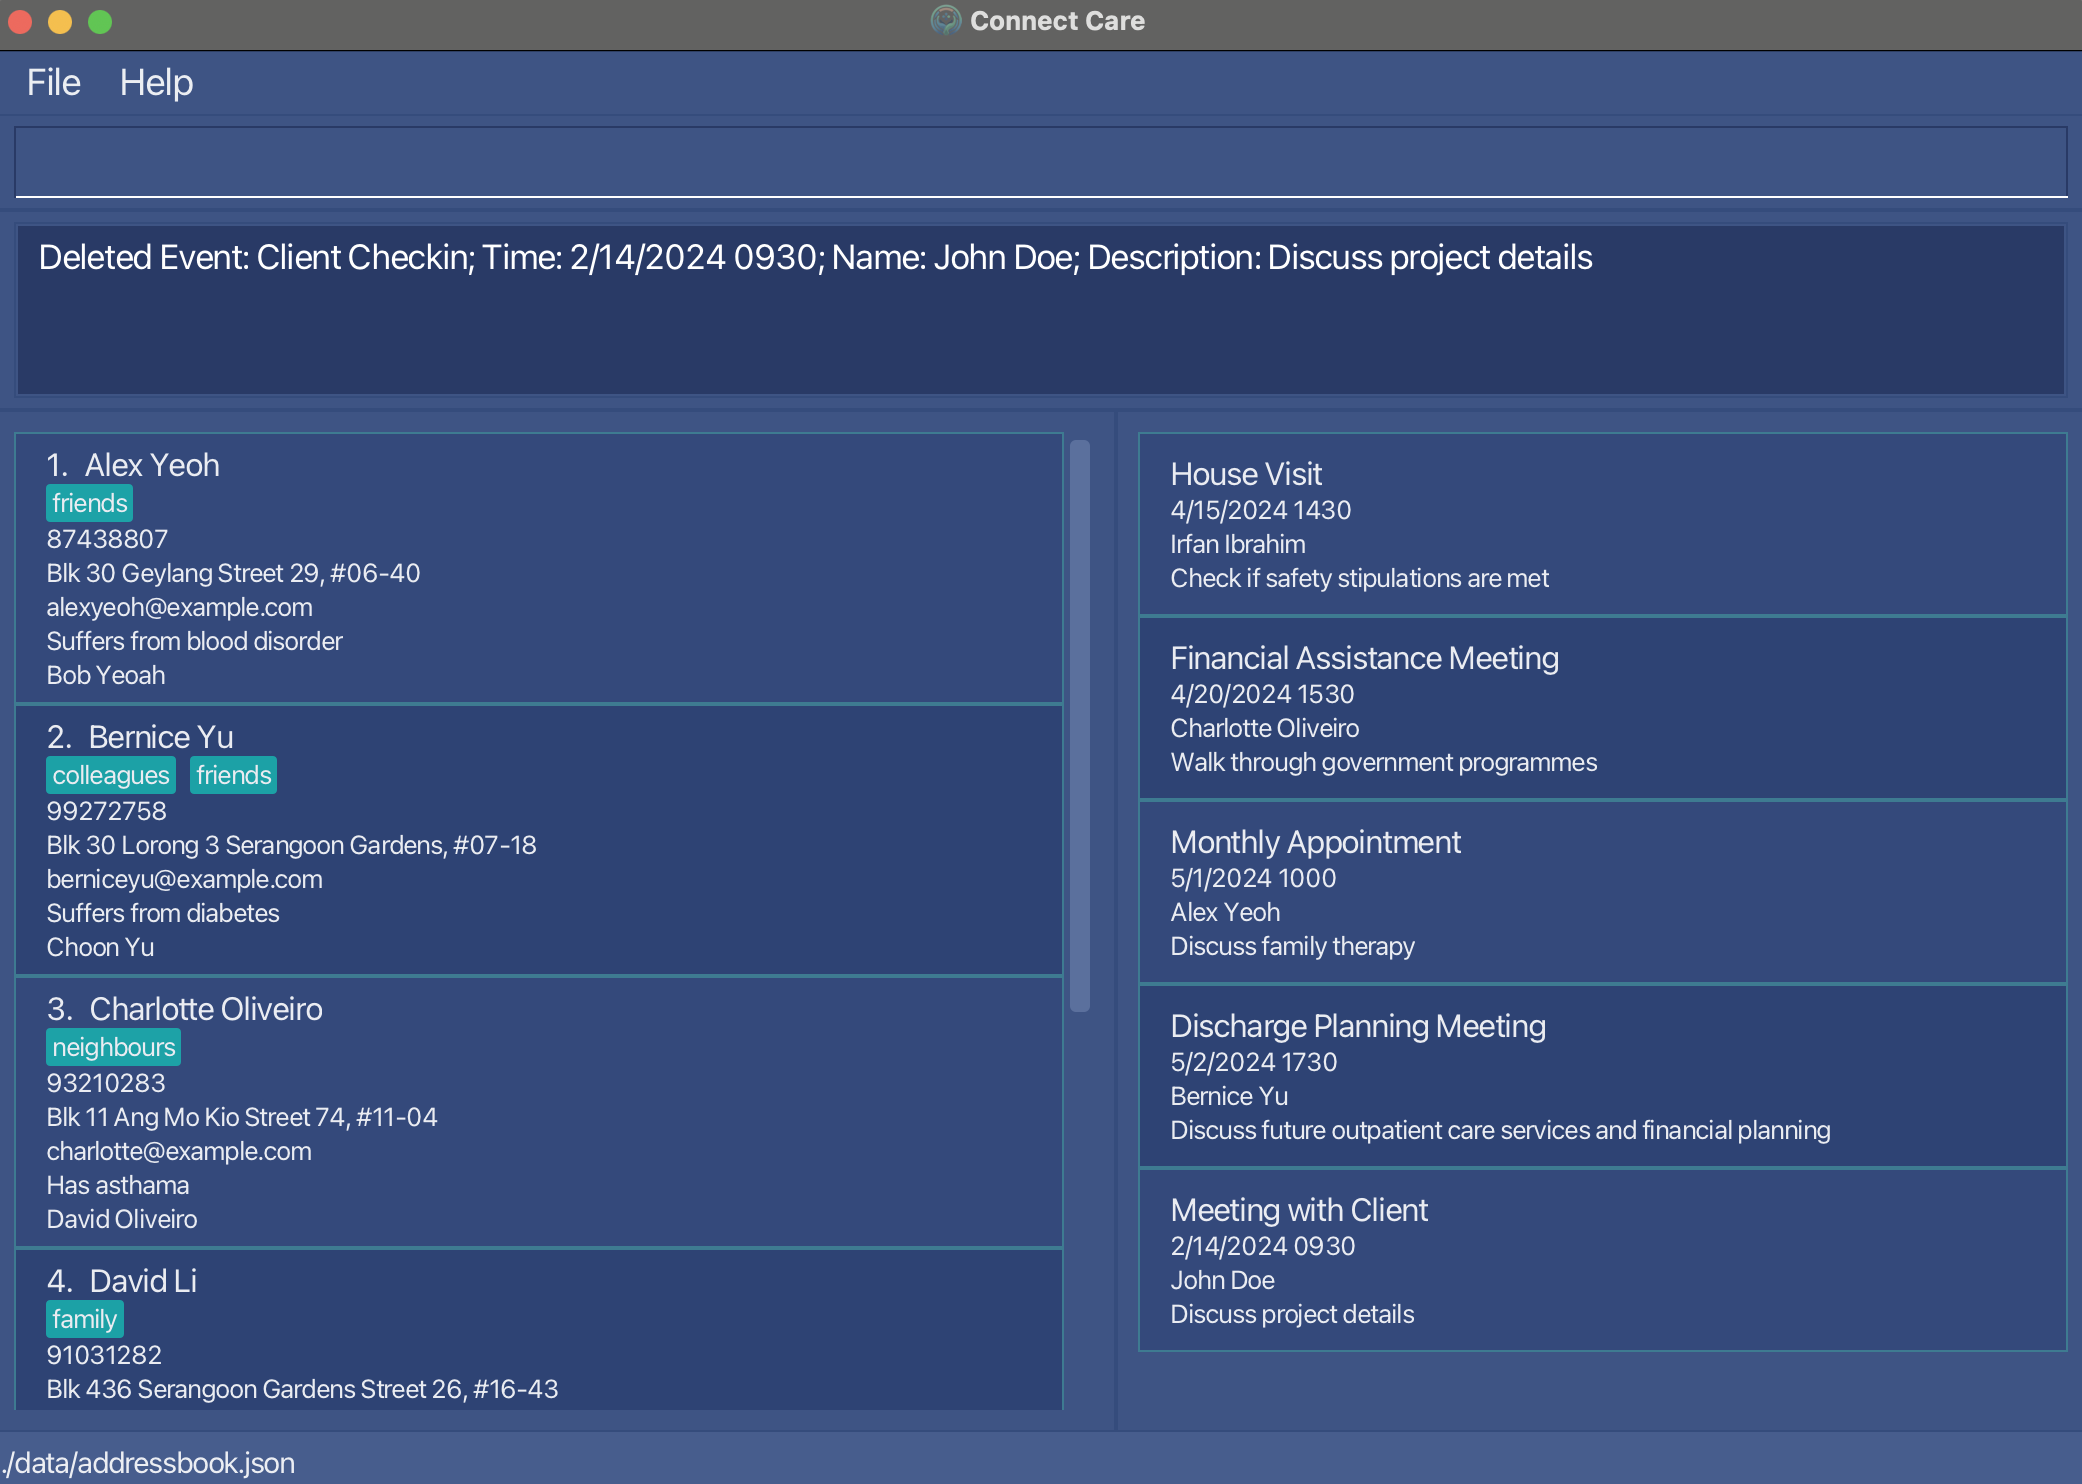
Figure 1.2: After the schedule delete command is executed
Click here to return to the table of contents!
Program Controls
ConnectCare provides the following commands for navigating the application:
- Undoing a command:
undo - Redoing a command:
redo - Shortcuts
uparrowdownarrow
Undoing a command : undo
This command allows you to undo your last command, restoring the ConnectCare application to its previous state.
Format: undo
Walkthrough:
The screenshots below are what you would expect when using the undo command.
In this example, after using the add command to add a new client Charlie, I wish to undo this addition as bertrand will not be assigned to me.
As seen in the second image, after using the undo command, Charlie is no longer present in the client list as his addition has been undone.
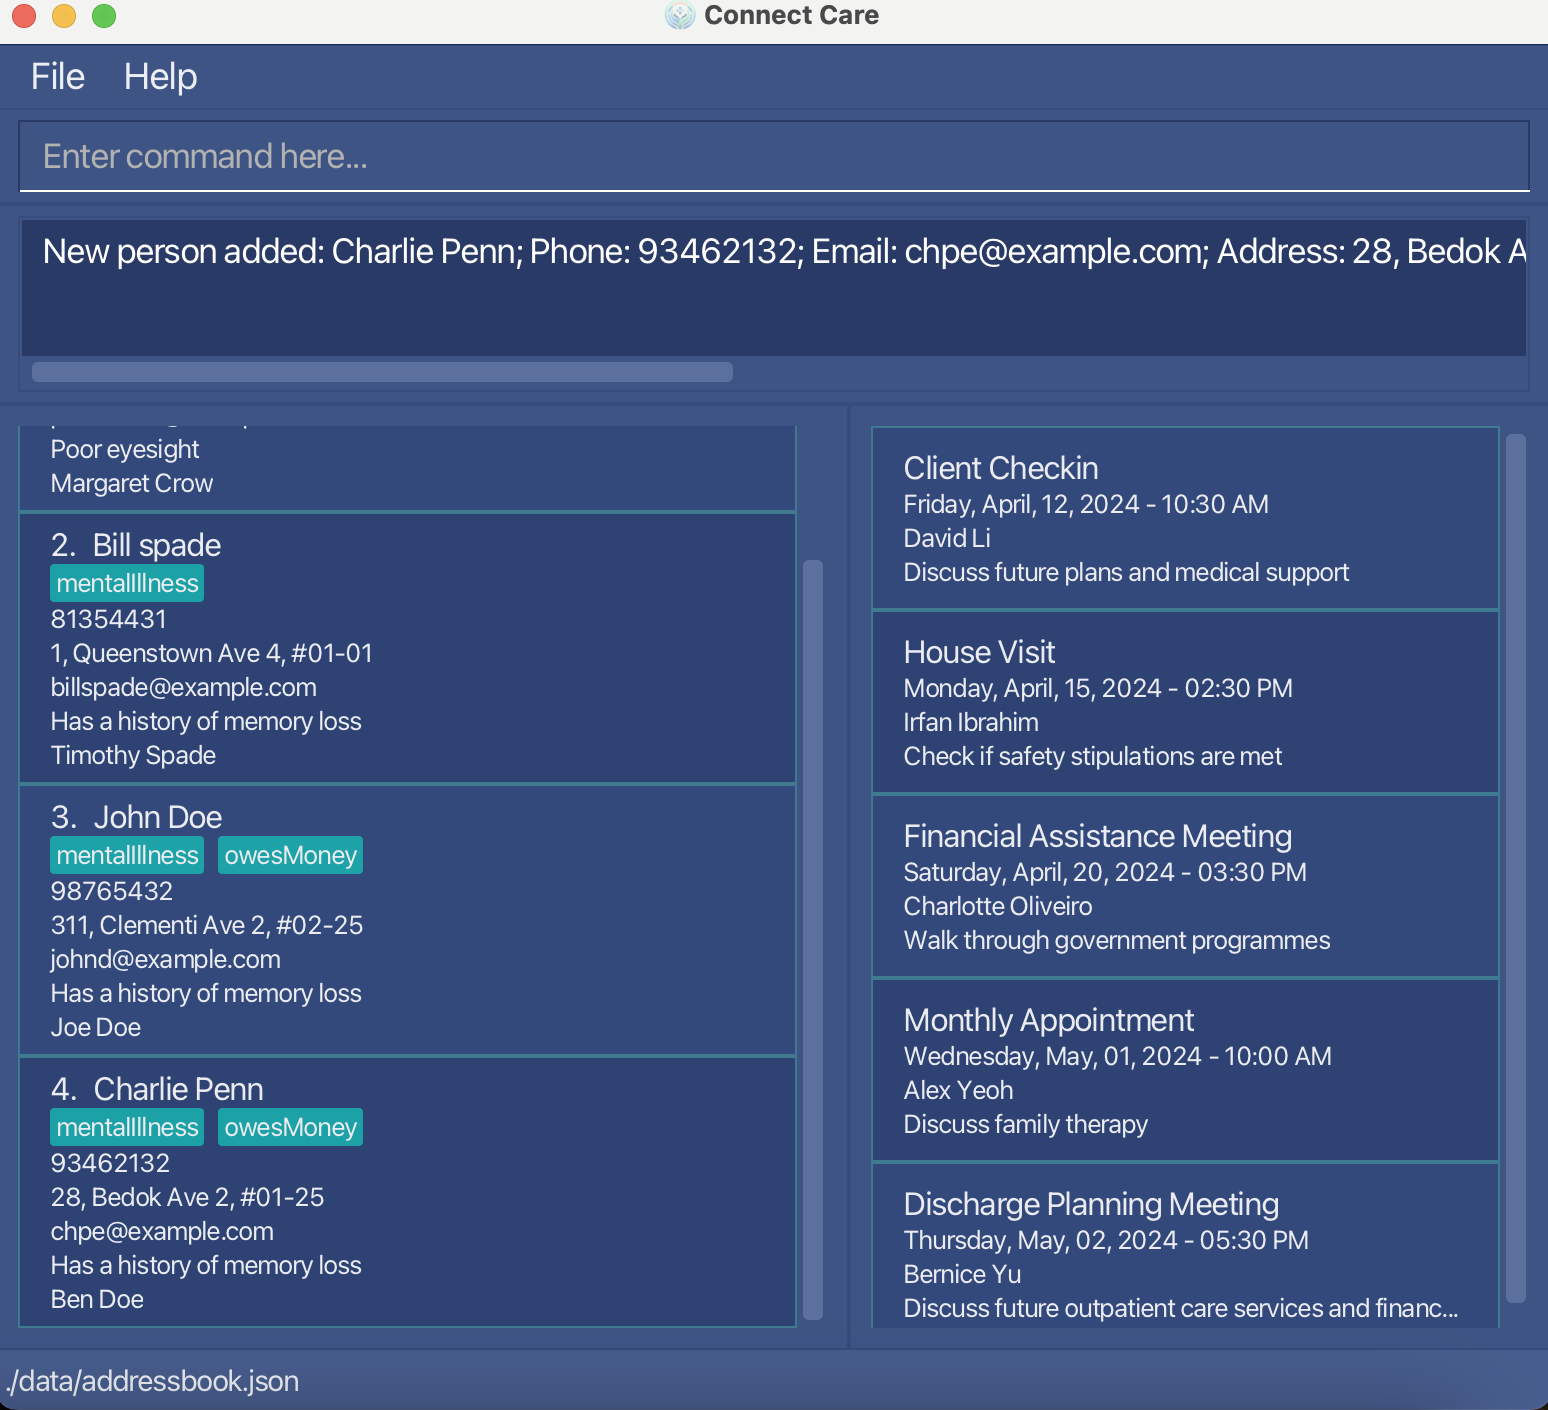 Figure 1.1: Before the undo command is executed
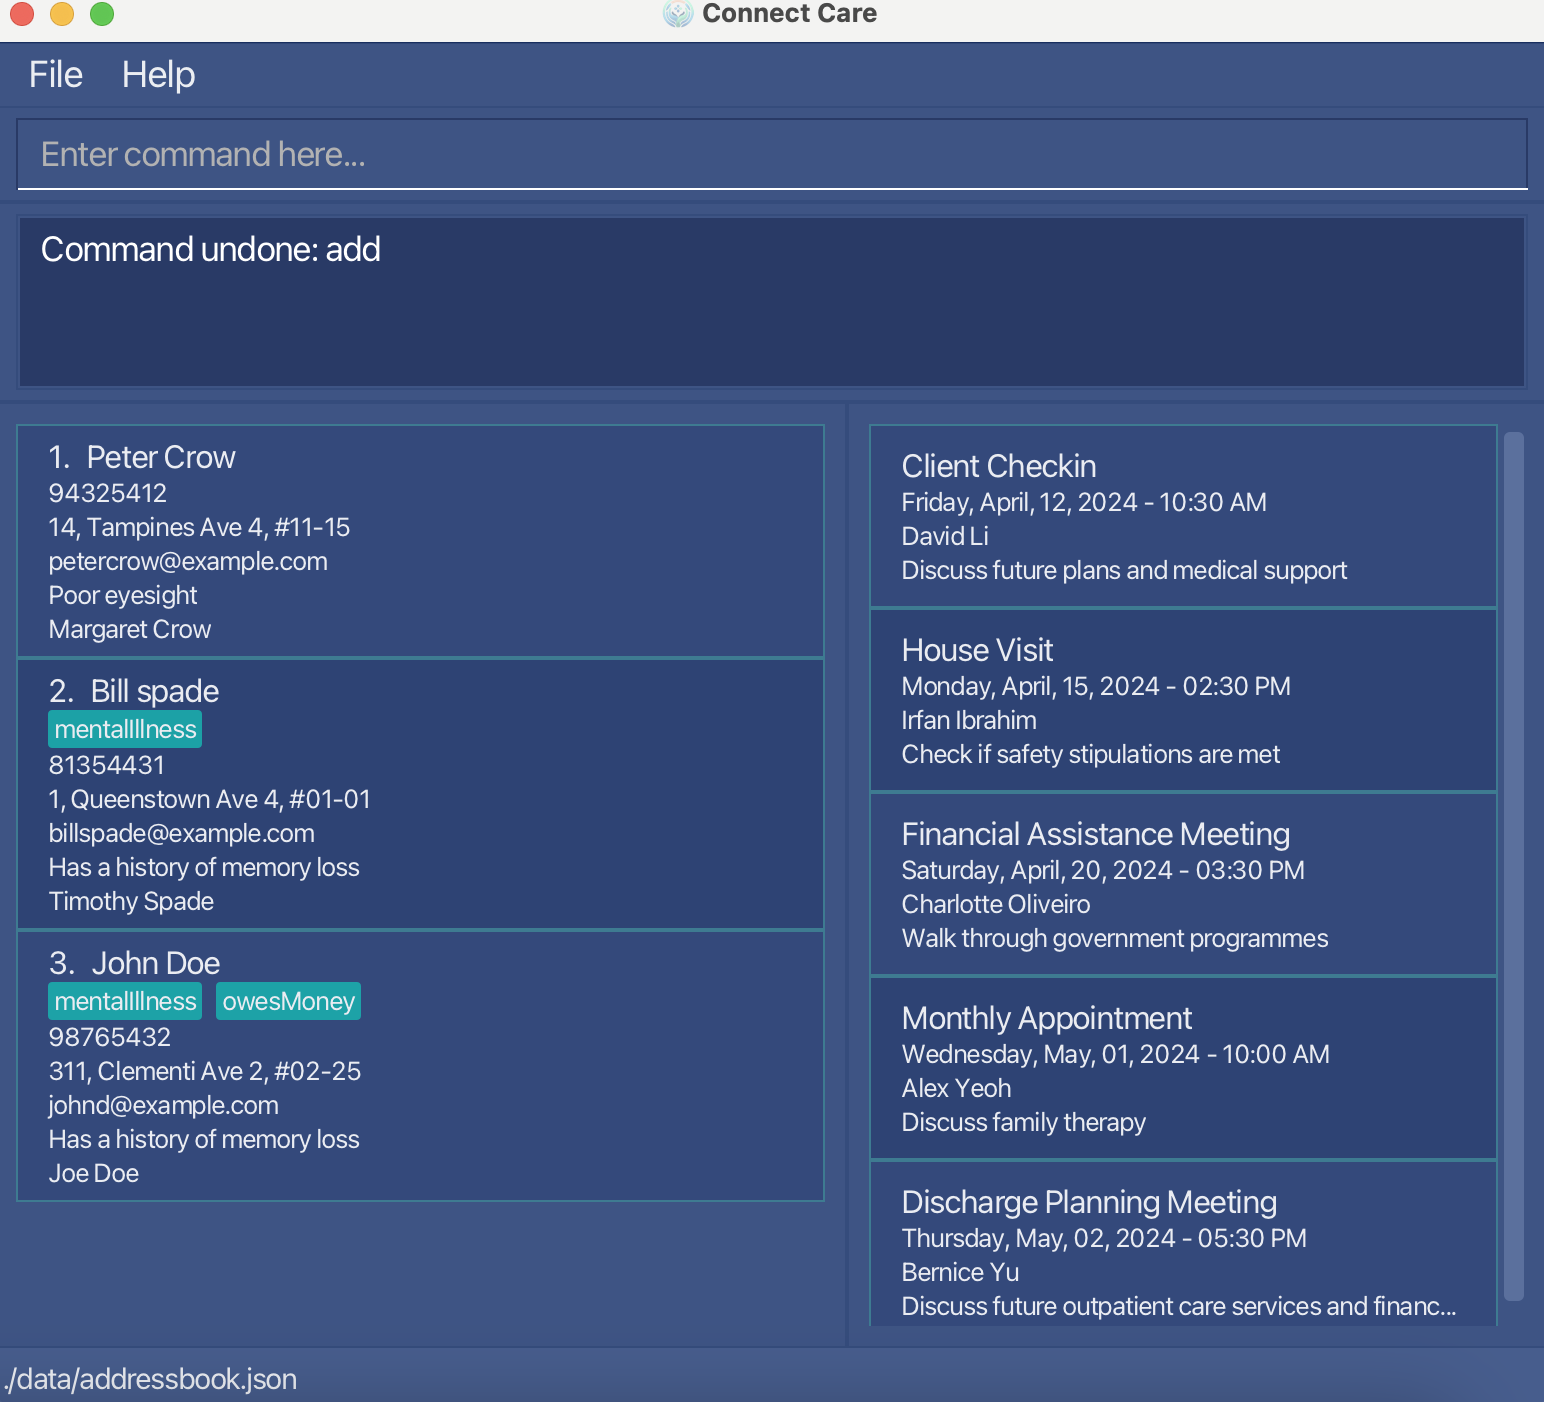 Figure 1.2: After the undo command is executed
Tip: The undo command does not undo every single command, only those that change the ConnectCare application in a significant way. If you are at the earliest state (i.e. you can't undo any command) an appropriate error message will be displayed: "You cannot rollback the state anymore!" For a comprehensive deep-dive into the undo command, please refer to the Implementation section of our Developer Guide
Click here to return to the table of contents!
Redoing a command : redo
This command allows you to redo your command, reversing any changes that were previously undone.
Format: redo
Walkthrough:
The screenshots below are what you would expect when using the redo command.
In this example, after undoing an update of my client's name from Peter Crow to Peter Crouch, we can see that the current client list has his name as Peter Crow
As seen in the second image, after using the redo command, the change is redone, and the client list shows the client's name as Peter Crouch
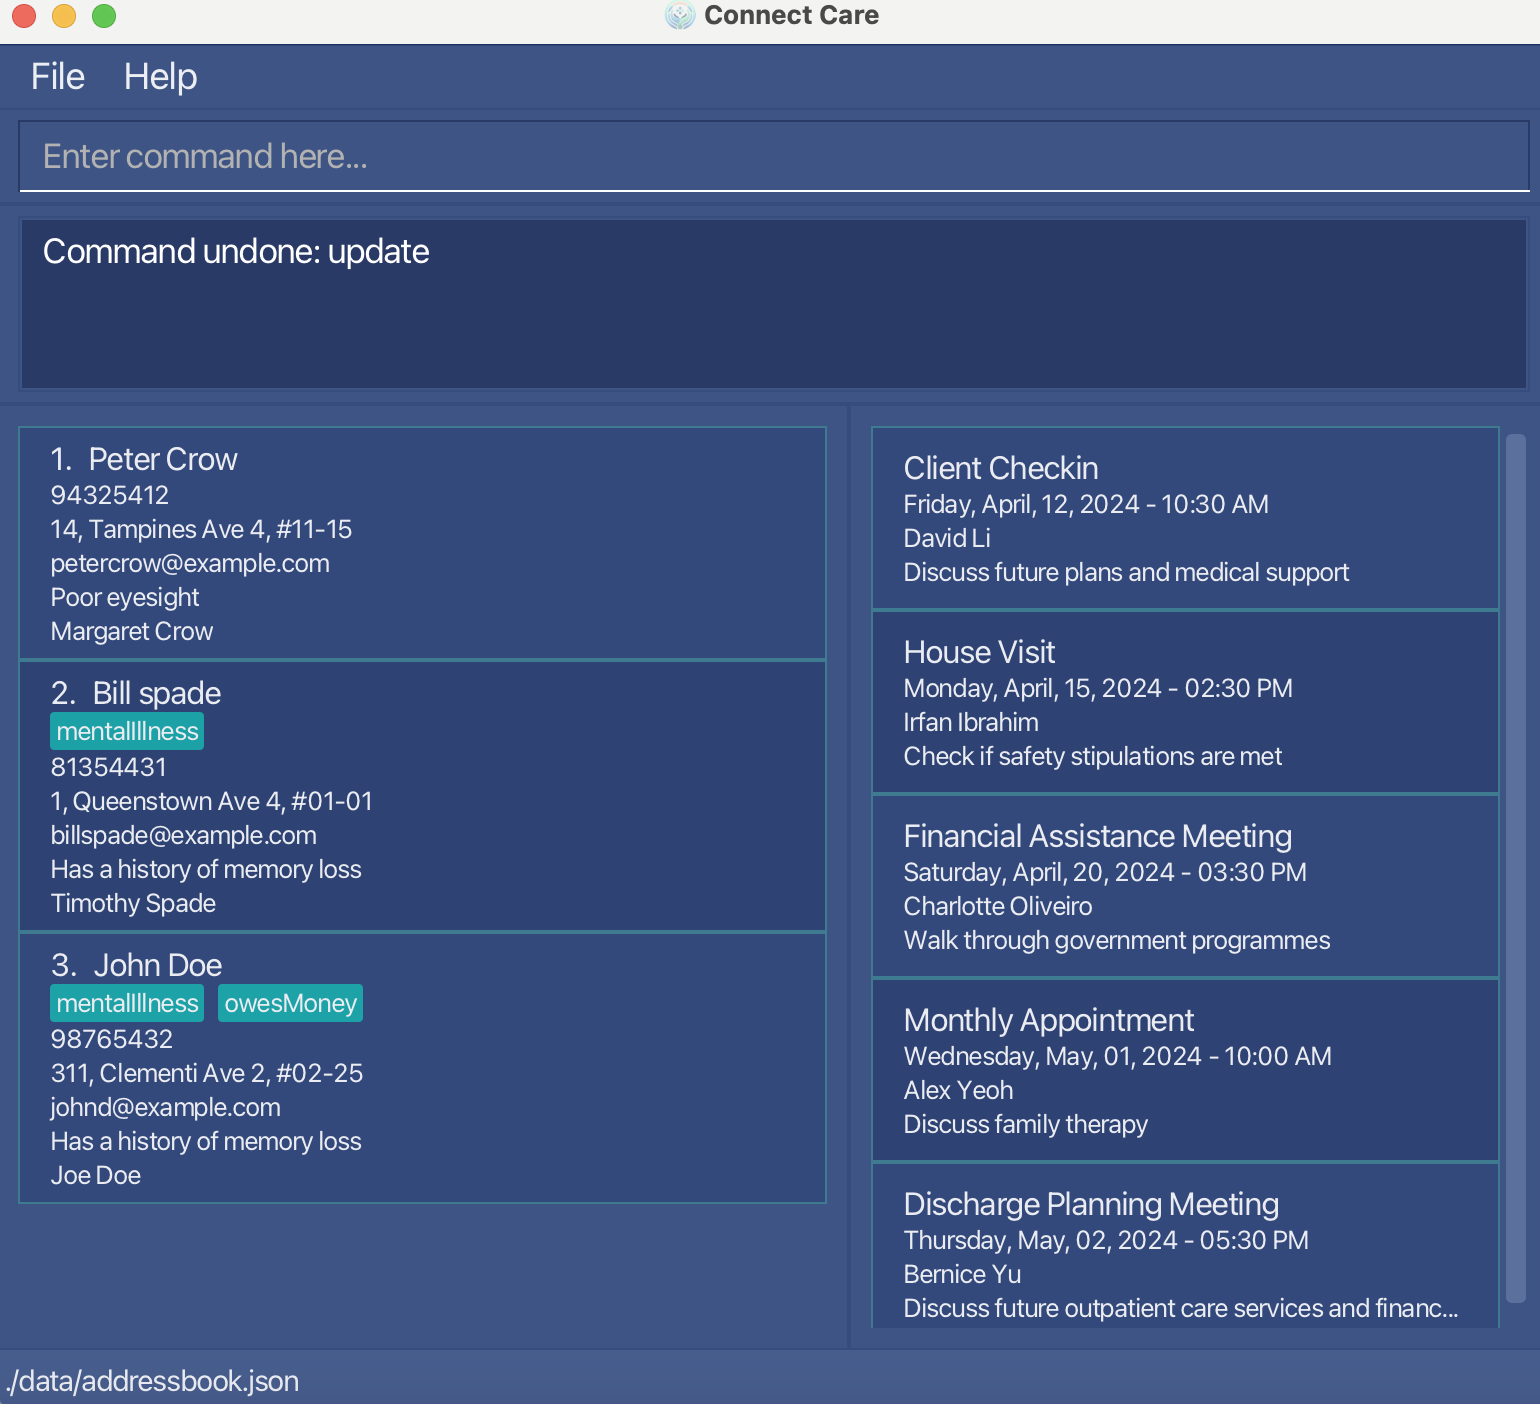 Figure 1.1: Before the redo command is executed
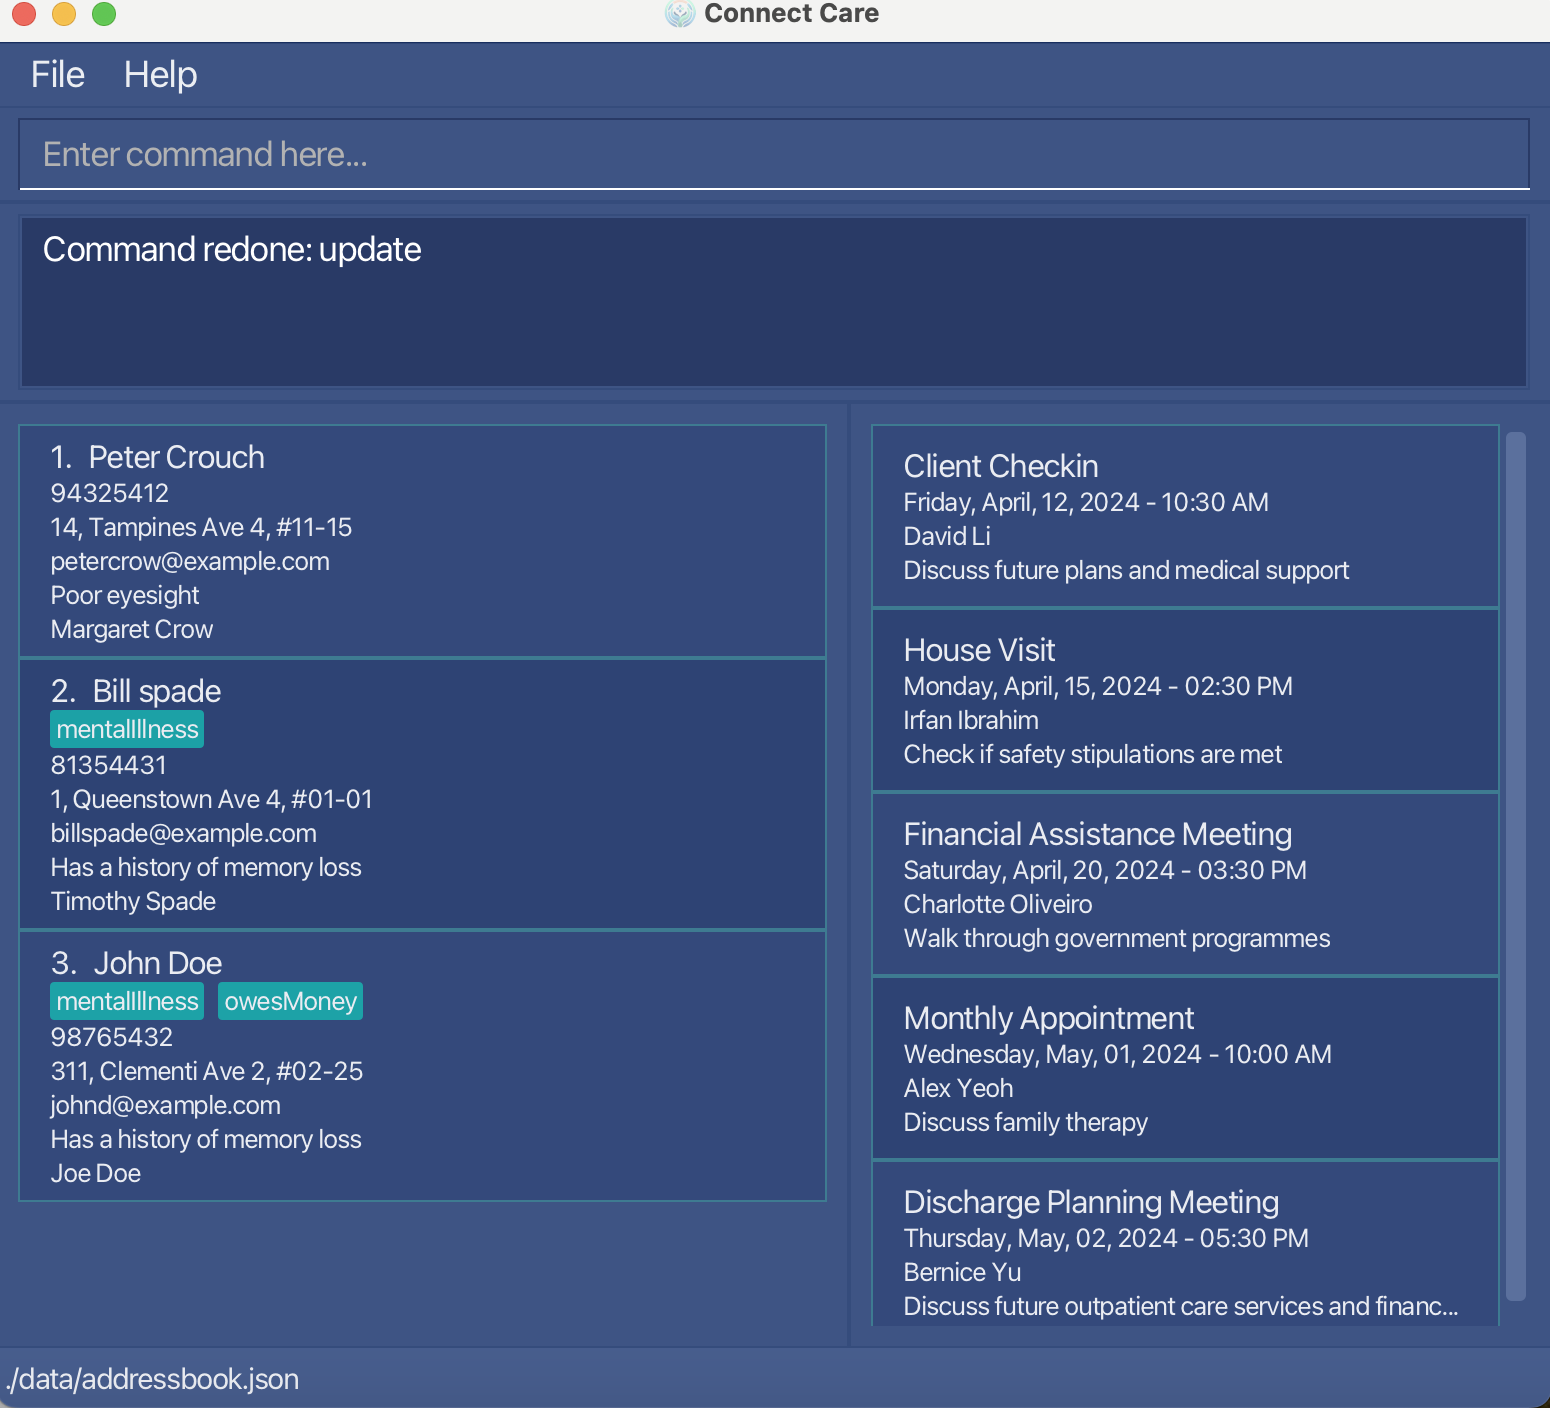 Figure 1.2: After the redo command is executed
Tip: The redo command does not redo every single command, only those that change the ConnectCare application in a significant way. If you are at the most recent state (i.e. you can't redo this command) an appropriate error message will be displayed: "You cannot roll forward the state anymore!" For a comprehensive deep-dive into the redo command, please refer to the Implementation section of our Developer Guide
Click here to return to the table of contents!
Shortcuts
These are a list of keyboard actions to better navigate our application
Tip: These shortcuts only work when the text box is selected.
| Action | Description |
|---|---|
Up | Displays the previous command entered, if any. |
Down | Displays the next command entered, if any. |
Note: A message will be displayed in the dialog "Keyboard Shortcuts: There are no more commands to display!" to notify users when there are no previous/next command available.
Note: Only commands that have been executed successfully will be saved.
Click here to return to the table of contents!
Now that we are better able to navigate our application, let's move on to explore the Miscellaneous commands!
Miscellaneous Commands
Viewing Help : help
This command displays a popup message with a link to access this User Guide.
Format: help
 Figure 1: Pop-up when the help command is entered
Click here to return to the table of contents!
Exiting the program : exit
This command allows you to exit the application.
Format: exit
Tip: You can simply close the window using the X button too!
Click here to return to the table of contents!
Saving the data
Your locally saved client list will be updated after any change is made, so no further action needs to be taken when operating the application! On start-up, your existing client list (if it exists) will also be automatically loaded, so don't worry about that!
Note: If it is your first time running the program, and there is no existing client list, a new file will automatically be generated to store your new client list once changes are made!
Click here to return to the table of contents!
Congratulations, you've reached the end of all of our current features! If you ever forget any of the commands a quick look at the command summary would help!
FAQ
Q: How do I transfer my data to another Computer?
A: Install the app in the other computer and overwrite the empty data file it creates with the file that contains the data of your previous AddressBook home folder.
Click here to return to the table of contents!
Command summary
| Action | Format | Examples |
|---|---|---|
| Add | add n/NAME p/PHONE_NUMBER e/EMAIL [a/ADDRESS] [k/NEXTOFKIN] [d/DESCRIPTION] [t/TAG]… | add n/James Ho p/22224444 e/jamesho@example.com a/123, Clementi Rd, 1234665 d/Suffers from anxiety k/Jon Ho t/friend t/colleague |
| Update | update u/existing user [n/NAME] [p/PHONE_NUMBER] [e/EMAIL] [a/ADDRESS] [t/TAG]… | Update u/Jane Doe n/John Doe p/98765432 e/johnd@example.com a/John street, block 123, #01-011 |
| Find | find [n/NAME]… [a/ADD]… [e/EMAIL]… [t/TAG]… [k/KIN]… [d/DESC]… [p/PHONE]… | find n/James a/clementi e/gmail t/important k/charles d/tall p/123 |
| Add Schedule | schedule add h/HEADING t/TIME d/DESCRIPTION n/CLIENT_NAME | schedule add h/Meeting with Client t/2/14/2024 0930 d/Discuss project details n/John Doe |
| Delete Schedule | schedule delete h/HEADING | schedule delete h/Meeting with Client |
| Undo | undo | |
| Redo | redo | |
| Display | display NAME | |
| Clear | clear | |
| Exit | exit |
Click here to return to the table of contents!
Glossary
CLI
CLI stands for Command Line Interface, which is a way for you to interact with the application with only textual commands, there is no need for a mouse. Once you learn the commands, CLIs can be faster for repetitive tasks than navigating menus with a mouse. For more information, see also the Wikipedia article for CLI
Local
Local applications runs on the same computer it is launched on and there is no program or data that is being ran or transferred to another remote machine. For more information, see also this Microsoft article for Local and Remote execution
Click here to return to the table of contents!